Search This Blog

Monday, June 30, 2025

How Do I Delete a Page

 Deleting a page in Oracle APEX is an important task when you need to remove outdated or unnecessary content from your application. Understanding how to properly delete a page ensures that your application remains clean, organized, and free from clutter. This blog post will guide you through the step-by-step process of safely deleting a page within Oracle APEX, highlighting best practices and considerations to avoid unintentional data loss or application issues.

Deleting a page in Oracle APEX is a simple but important process to help keep your application clean and organized. When you decide that a page is no longer needed, you can remove it completely from your application through the Application Builder interface. It is important to ensure that deleting the page will not affect any critical functionality or dependencies elsewhere in the application.

To delete a page, first log in to Oracle APEX and open your application in the Application Builder. In the list of pages, find the page you want to delete. You can use the search box or browse the page list to locate it easily. Once you have identified the page, click on the page name or number to open its properties. On the page editor toolbar, look for the "Actions" menu (represented by a gear icon) or the "More" button, depending on your APEX version. From this menu, select the option “Delete Page.”

Before confirming the deletion, APEX may warn you about dependencies such as references to this page in navigation menus, branch processes, or dynamic actions. It is advisable to review these dependencies carefully. If the page contains critical components or links, make sure to update or remove them to avoid broken navigation or errors. After confirming, APEX will permanently remove the page and all its components, including regions, items, processes, and validations tied to that page.

If you accidentally delete a page, Oracle APEX does not have a built-in undo feature, so it is essential to have backups or export your application regularly. Additionally, consider deactivating or disabling the page first if you want to test the impact before permanent removal. This cautious approach helps ensure that deleting a page does not cause unintended consequences in your application.

By following these detailed steps, you can confidently and safely delete pages in Oracle APEX, maintaining a streamlined and efficient application.

To delete a page in Oracle Application Express (APEX), follow these steps:

Select the application containing the page you wish to delete.

  1. Open the Page in Page Designer:

    • In the App Builder, click on the page you want to delete. This action will open the Page Designer for that page.

  2. Delete the Page:

    • In Page Designer, click the Utilities menu in the toolbar.

    • Select Delete Page.

    • A confirmation dialog will appear. Click Permanently Delete Page to confirm the deletion.

Note: Deleting a page will also remove associated elements such as tabs, breadcrumbs, and list entries.

A screenshot of a computer

AI-generated content may be incorrect.

A screenshot of a computer

AI-generated content may be incorrect.

In conclusion, deleting a page in Oracle APEX is a straightforward process that helps maintain the efficiency and relevance of your application. By carefully following the deletion steps and verifying dependencies, you can confidently remove pages without disrupting your application’s functionality. Keeping your application tidy through page management improves user experience and simplifies ongoing maintenance.

How Do I Create a Page

 Creating a new page in Oracle APEX is a fundamental step in building any application. Whether you are designing a form, report, chart, or a dashboard, understanding how to create and configure pages effectively is essential for delivering a seamless user experience. This process involves selecting the appropriate page type, linking data sources, and customizing layout and components to meet your application requirements.

Creating a page in Oracle APEX is a straightforward yet powerful process that allows you to build various types of user interfaces such as forms, reports, charts, and dashboards. Here is a detailed step-by-step guide on how to create a page in Oracle APEX:

  1. Log in to Oracle APEX and open your application in the Application Builder.

  2. Click on the "Create" button, usually found on the application home page or within the Page Designer interface.

  3. Choose the type of page you want to create. Oracle APEX offers multiple page types such as:

    • Form (for data entry and editing)

    • Report (Interactive Report, Classic Report, or Interactive Grid)

    • Chart (various chart types)

    • Dashboard or Blank Page

    • Calendar, Map, or others based on your application needs

  4. Select the data source for the page. For example, if creating a form or report, select the table or view that the page will interact with. You can also use SQL queries for more customized data retrieval.

  5. Configure page settings such as the page name, page number (which is auto-assigned but can be changed), and the page mode (Modal, Inline, or Normal).

  6. For forms and reports, configure additional options such as:

    • Which columns or fields to include

    • Display settings (labels, item types, default values)

    • Validation rules for form inputs

    • Interactive Report settings like filters, pagination, and sorting

  7. Customize the page layout and regions. You can add multiple regions like reports, buttons, charts, or HTML content and arrange them as needed using drag-and-drop in the Page Designer.

  8. Define navigation and branching. Set up menu entries or buttons that allow users to navigate between pages or submit forms.

  9. Review and adjust authorization and authentication settings to control page access.

  10. Click "Create" or "Save" to finalize the page creation.

After creating the page, you can further customize it by adding dynamic actions, processes, and plugins to enhance interactivity and functionality.

By following these steps carefully, you can efficiently create pages that are well-structured, user-friendly, and tailored to your application’s requirements. Oracle APEX’s page creation process is designed to accelerate development while maintaining flexibility and control.

Example

Creating a page in Oracle Application Express (APEX) is a streamlined process that leverages the platform's intuitive tools, such as the Create Page Wizard and Page Designer. Here's a step-by-step guide to assist you:

  1. Initiate the Page Creation Process:

    • On the application's home page, click the Create Page button.


A screenshot of a computer

AI-generated content may be incorrect.

  1. Choose the Page Type:

    • APEX offers various page types, including:

      • Component: Pages like Forms, Reports, Charts, Calendars, etc.

      • Feature: Functional pages such as About Pages, Access Control, Feedback, etc.

    • Select the page type that aligns with your requirements.

A screenshot of a computer

AI-generated content may be incorrect.

In this case we are selecting the “Classic” Report.

  1. Configure Page Attributes:

    • Provide essential details such as:

      • Page Name: A descriptive title for the page.

      • Navigation Preferences: Determine if and where the page appears in the application's navigation menu.

A screenshot of a computer

AI-generated content may be incorrect.

  • Specify the data source or table associated with the page, if applicable.

  1. Finalize and Create the Page:

    • Review your configurations.

    • Click Create Page to generate the new page.

  2. Design and Customize Using Page Designer:

    • APEX's Page Designer offers a drag-and-drop interface for:

      • Adding or modifying regions and items.

      • Setting properties and layouts.

      • Implementing dynamic actions and validations.

Run the page by clicking on the green button on the top right side.

A screenshot of a computer

AI-generated content may be incorrect.


Your page should look very empty and plain like this:

A blue and white screen

AI-generated content may be incorrect.

By mastering the process of creating pages in Oracle APEX, developers can efficiently build dynamic and responsive applications. Proper page creation ensures that data is displayed and managed accurately while providing users with intuitive navigation and interaction. This foundational skill supports scalable development and enhances the overall quality of your applications.

How Do I Use User Interface Defaults

 User Interface (UI) Defaults in Oracle APEX help developers save time and maintain consistency when building forms and reports. These defaults automatically define how items and columns appear—such as the type of form item used for a particular data type, label settings, validation rules, and formatting preferences. By using UI Defaults, you can ensure that every time a form or report is created from a table, the same design and behavior is applied automatically, reducing repetitive configuration. This is especially useful in applications with many similar data entry or report pages.

User Interface (UI) Defaults in Oracle APEX provide a powerful way to standardize and automate the appearance and behavior of form items and report columns across your applications. 

To use UI Defaults effectively, you start by defining default settings at the table or column level, specifying attributes such as item types, display formats, validations, and alignment. These defaults are then automatically applied whenever you create forms or reports based on those tables, saving development time and ensuring consistency.

To begin, you can manage UI Defaults via SQL Workshop by selecting the target table and configuring defaults for each column, such as setting a VARCHAR2 column to use a Text Field or an Email item, or specifying a Date column to use a Date Picker with a particular format. When you generate a form or report in Application Builder, Oracle APEX reads these defaults and applies them automatically to the generated page components.

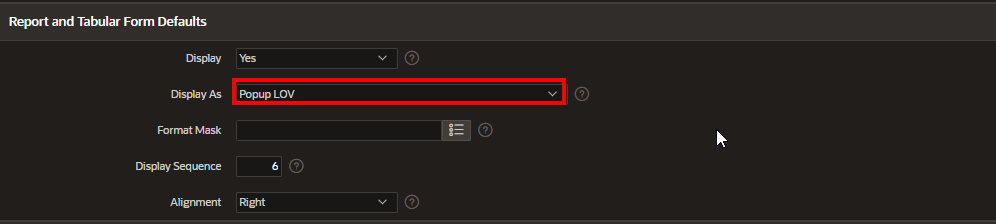
Additionally, UI Defaults allow you to define report-specific attributes like column alignment, format masks (for currency, dates, or numbers), and whether columns are visible or hidden. This way, reports maintain a consistent look and usability without needing manual adjustments each time.

If needed, you can override these defaults at the page or item level during form or report creation to tailor specific behaviors for certain use cases. This flexibility combined with automation makes UI Defaults an essential feature for efficient Oracle APEX development, enabling standardized design patterns while accommodating individual requirements.

User Interface (UI) Defaults in Oracle APEX offer a comprehensive and standardized method to control the appearance and behavior of forms, reports, and other user interface components throughout your applications. By carefully configuring UI Defaults, developers significantly increase efficiency, maintain a consistent user experience, and simplify long-term application maintenance. When UI Defaults are set prior to page creation, fields, labels, validations, and format masks are automatically applied by APEX, which reduces the need for repetitive manual customization and ensures a uniform look and functionality across all generated forms and reports.

In Oracle APEX, UI Defaults streamline application development by allowing developers to define default settings at the table and column level. These settings control various properties including item types (such as text fields, select lists, or date pickers), display formatting, validation rules, and help text. This standardization promotes usability by ensuring that forms and reports consistently reflect the intended design and business rules, which also accelerates development by eliminating redundant configuration tasks.

UI Defaults are organized into two primary components that work together to enforce consistency:

  1. Table Dictionary

    • Scope: Applies specifically to tables and their individual columns within a selected schema.

    • Function: Allows setting default properties such as labels, formatting, default item types, and help text for specific tables and their columns.

    • Priority: When generating pages, settings defined here take precedence and override those specified in the Attribute Dictionary. This allows for table-specific customization when necessary.

  2. Attribute Dictionary

    • Scope: Applies across all tables within the schema, affecting attributes or column names globally.

    • Function: Establishes default UI settings for attributes by name, ensuring consistent behavior and appearance regardless of which table contains the attribute.

    • Synonyms: Supports attribute synonyms so that multiple column names that represent the same concept can share a unified UI Default definition.

By leveraging both dictionaries, developers can enforce consistent UI behavior across multiple pages and applications, simplifying development and enhancing user experience through uniform design patterns and predictable interactions.

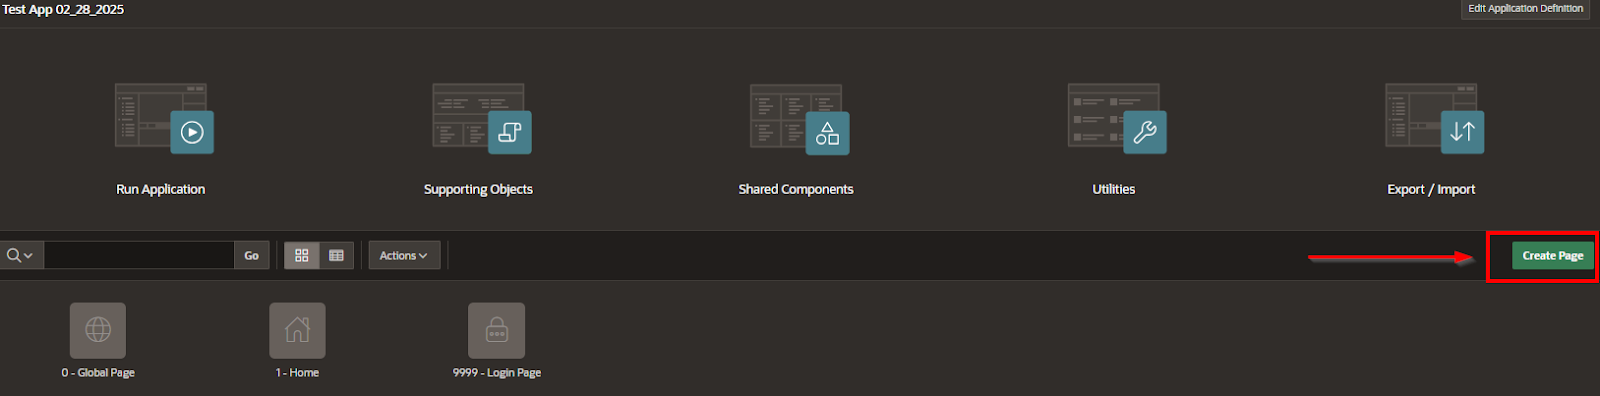
To configure UI Defaults in Oracle APEX, navigate to:
SQL Workshop > Utilities > UI Defaults

Example: Setting the "State_ID" Column to Always Appear as a Dropdown (Select List)

A common requirement is to ensure that a column like State_ID always appears as a dropdown list in forms and reports throughout the application. Using UI Defaults, you can define this behavior globally once, and APEX will automatically apply it everywhere the column is used.

Step-by-step process to configure “State_ID” as a Select List using UI Defaults:

  1. Access User Interface Defaults:

    • Open your APEX workspace and go to the App Builder.

    • Select Shared Components.

    • In the User Interface section, click on User Interface Defaults.

  2. Locate the Relevant Table:

    • Use the search box and enter the table name (e.g., People).

    • Select the People table from the results.

  3. Configure the State_ID Column:

    • Within the People table’s UI Defaults, locate the State_ID column.

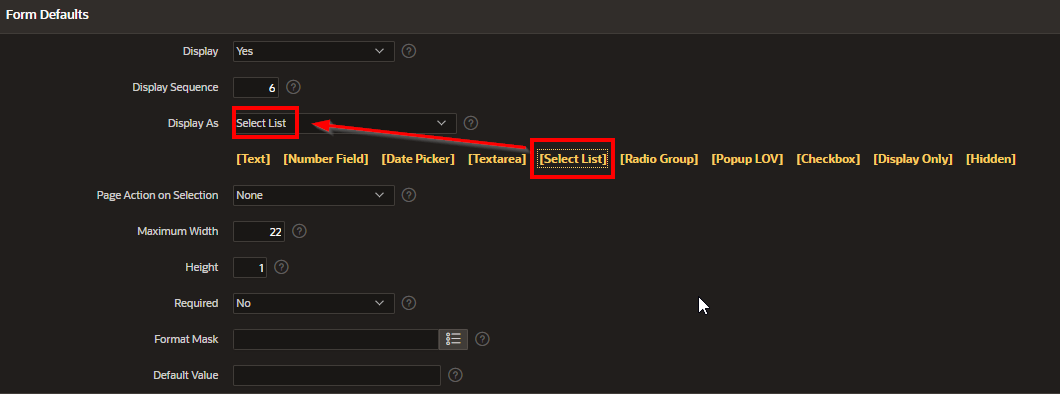
    • Set the Item Type to Select List (dropdown).

    • Define the List of Values (LOV) for the select list. This can be:

      • A static list of values representing states (e.g., ‘CA’ for California, ‘NY’ for New York), or

      • A dynamic query that fetches state IDs and names from a States lookup table.

  4. Apply Changes:

    • Save your changes to persist the UI Default configuration.

Once configured, any new form or report that includes the State_ID column will automatically render it as a dropdown with the defined list of states. This automatic application eliminates the need to manually adjust the item type for each page.

Additional Considerations:

  • Existing Forms and Reports:
    After updating UI Defaults, you may need to manually synchronize or edit existing forms and reports to pick up the new default settings. This typically involves opening the form or report in Application Builder and reapplying defaults or regenerating the page components.

  • New Forms and Reports:
    Any new forms or reports created after the UI Defaults are set will immediately inherit the defined configurations for the State_ID column and other specified attributes.

Attribute Dictionary

  • Scope: Affects attributes or column names across all tables.

  • Function: Establishes default settings at the attribute level, ensuring consistency across different tables.

  • Synonyms: Supports synonyms, allowing multiple attributes to share a unified definition.

By leveraging UI Defaults, developers can ensure a consistent design and behavior across multiple pages within an application or even across different applications. This simplifies development, reduces manual adjustments, and enhances the overall user experience.

Navigate to : SQL Workshop > Utilities >UI Defaults

A black screen with white text

AI-generated content may be incorrect.

To ensure that the "State_ID" column consistently appears as a dropdown (select list) in all forms within your Oracle Application Express (APEX) application, you can utilize User Interface Defaults. This feature allows you to define default settings for table columns, ensuring uniform behavior across various forms and reports.

Steps to Set "State_ID" as a Dropdown Using User Interface Defaults:

  1. Access User Interface Defaults:

    • Navigate to the App Builder in your APEX application.

    • Select Shared Components.

    • Under the User Interface section, click on User Interface Defaults.

  2. Locate the Relevant Table:

    • In the User Interface Defaults page, find and select the table containing the "State_ID" column.

  3. Configure the "State_ID" Column:

    • Within the table's settings, locate the "State_ID" column.

    • Set the Item Type to Select List.

    • Define the List of Values (LOV) for the select list. This can be a static list or a dynamic query that retrieves state identifiers and names.

  4. Apply Changes:

    • Save your configurations.

By setting these defaults, any form or report that incorporates the "State_ID" column will automatically render it as a dropdown with the specified list of values, ensuring consistency throughout your application.

Additional Considerations:

  • Existing Forms and Reports: After updating the UI Defaults, you may need to synchronize existing forms and reports to apply the new settings. This can be done by editing the form or report and reapplying the default settings.

  • New Forms and Reports: Any new forms or reports created after setting the UI Defaults will automatically adopt these configurations for the "State_ID" column.


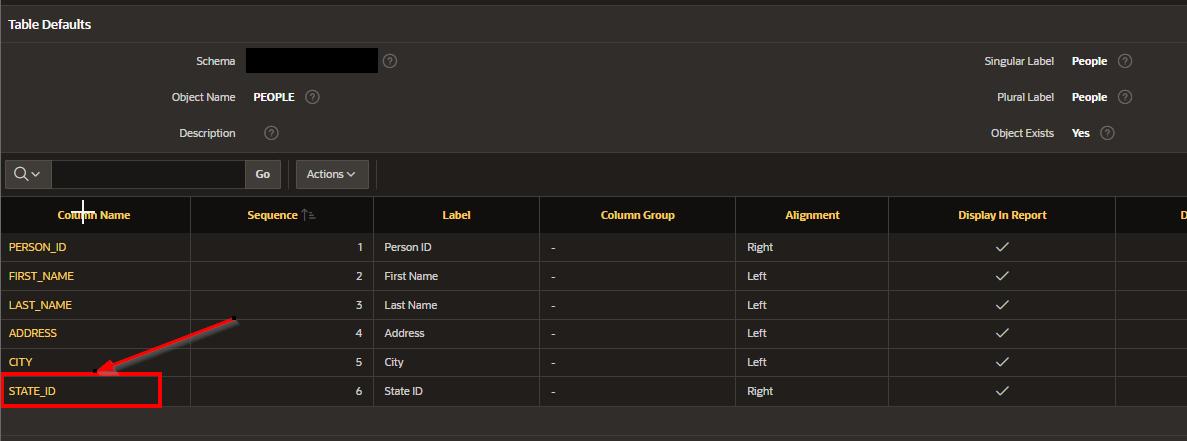
Enter “People” in the Search box

A screenshot of a computer

AI-generated content may be incorrect.

Select the tabler name “People”

A black rectangular object with orange and black text

AI-generated content may be incorrect.


Select the State_ID column

 A screenshot of a computer

AI-generated content may be incorrect.


A screenshot of a computer

AI-generated content may be incorrect.


A screenshot of a computer

AI-generated content may be incorrect.

A screen shot of a computer

AI-generated content may be incorrect.


By effectively using UI Defaults in Oracle APEX, developers gain a powerful tool to enforce consistency, reduce manual effort, and maintain a clean, predictable user interface across all application components. This ultimately leads to faster development cycles and a better experience for both developers and end users.

Using UI Defaults effectively allows you to standardize how your application looks and functions, while still offering flexibility to override these defaults as needed. Whether you're generating a new form, creating a report, or refining the interface for a better user experience, UI Defaults give you a strong foundation to work from. By understanding and applying them properly, you streamline development, enforce consistency, and improve maintainability across your Oracle APEX applications.

How Do I Override UI Defaults

 Introduction

In Oracle APEX, UI Defaults provide a powerful way to standardize how forms and reports are generated across your applications. However, there are times when you need to override these defaults to meet specific business requirements or design preferences. Whether it’s changing the item type of a field, adjusting formatting, or applying different validations for a particular page, Oracle APEX gives you full control to customize UI elements beyond the defaults. This flexibility ensures that while consistency is maintained application-wide, exceptions can be handled with ease when needed.

In Oracle APEX, UI Defaults serve as a time-saving and consistency-enforcing feature, but they are not final. You can override UI Defaults at any point during the development process to customize the behavior, layout, and formatting of individual form items or report columns. These overrides are especially useful when you need an exception to the default behavior configured at the table or column level.

To override UI Defaults, begin by navigating to the Page Designer for the page where the default has been applied. Select the region (such as a form or report) and then click on the item or column that was generated using UI Defaults. APEX allows you to manually modify any of the properties that were inherited. For example, if a column was set to display as a Text Field by default, you can change it to a Select List, Date Picker, or any other supported item type. Likewise, formatting masks, label settings, alignment, default values, and validations can all be adjusted directly in the item's or column’s property editor.

For forms:

  1. Open the page in Page Designer.

  2. Select the form region.

  3. Click on the item you want to customize.

  4. In the property pane, override the default by changing the “Item Type,” “Label,” “Default Value,” or any other setting.

  5. Save and run the page to test the changes.

For reports:

  1. Open the page in Page Designer.

  2. Select the report region (Classic or Interactive Report).

  3. Click on the report column you want to update.

  4. Change display type, alignment, formatting mask, or visibility.

  5. Save and run the page.

If you are working with Interactive Reports or Grids, you can also override settings such as column sorting, filter behavior, or formatting through the column attributes.

Although UI Defaults apply automatically, developers can override them when necessary.

To override UI Defaults:

  1. Edit the Form or Report

  2. Go to the Attributes section

  3. Modify the settings as needed

  4. Save the changes

This flexibility allows developers to customize individual items while still benefiting from globally defined UI Defaults.

Exporting and Importing UI Defaults

UI Defaults can be exported and imported between APEX environments, making it easy to maintain consistency across multiple applications.

Export UI Defaults

  1. Go to SQL Workshop > Utilities > Data Dictionary Reports

  2. Select Export UI Defaults

  3. Download the generated SQL file

Import UI Defaults

  1. Go to the target APEX environment

  2. Run the exported SQL file in SQL Commands

  3. UI Defaults will be applied automatically

This is useful when deploying applications across development, testing, and production environments.

Best Practices for Using UI Defaults

  • Set UI Defaults before creating pages to save time

  • Use consistent format masks for date, number, and currency fields

  • Configure validation rules at the database and UI level

  • Regularly review UI Defaults to align with application requirements

  • Use meaningful labels and tooltips to improve user experience

Keep in mind, overrides only apply to the specific component or page where you change them. They do not affect other components that use the same table or column unless you apply similar changes manually.

By overriding UI Defaults, developers gain the flexibility to adjust and refine the user interface to suit special use cases while still benefiting from the consistency and efficiency of default settings. This approach provides a balance between rapid development and tailored user experience.

Conclusion

Overriding UI Defaults in Oracle APEX allows developers to fine-tune the user interface to fit unique cases without compromising the overall design consistency. By understanding when and how to apply these overrides, you can enhance user experience, address special requirements, and maintain high-quality standards throughout your application. The ability to adapt UI elements per page or item ensures that APEX remains a flexible, developer-friendly platform for building modern web applications.

How Do I Make a Faceted Search Map Page in Oracle APEX

Combining faceted search with a map region in Oracle APEX enables users to filter data visually and spatially at the same time. This design ...