Search This Blog

Monday, June 30, 2025

Create Tables Using the Object Browser

 Introduction

Creating tables using the Object Browser in Oracle APEX is a quick and user-friendly way to define and manage your database structure without writing SQL code manually. The Object Browser provides a visual interface where you can easily create tables, define columns, set data types, add constraints, and manage keys—all from within your web browser. This is especially helpful for developers who want to focus on application logic while handling basic database tasks efficiently.

Creating Tables Using the Object Browser in Oracle APEX
Oracle APEX provides a built-in Object Browser tool that lets you visually create and manage tables without writing SQL code. This is especially helpful for rapid development, prototyping, or for users who prefer a guided interface to define their data structures. Using the Object Browser, you can set up columns, define data types, apply constraints, and configure primary keys—all within a few clicks.

Accessing the Object Browser

  1. Log in to your Oracle APEX workspace.

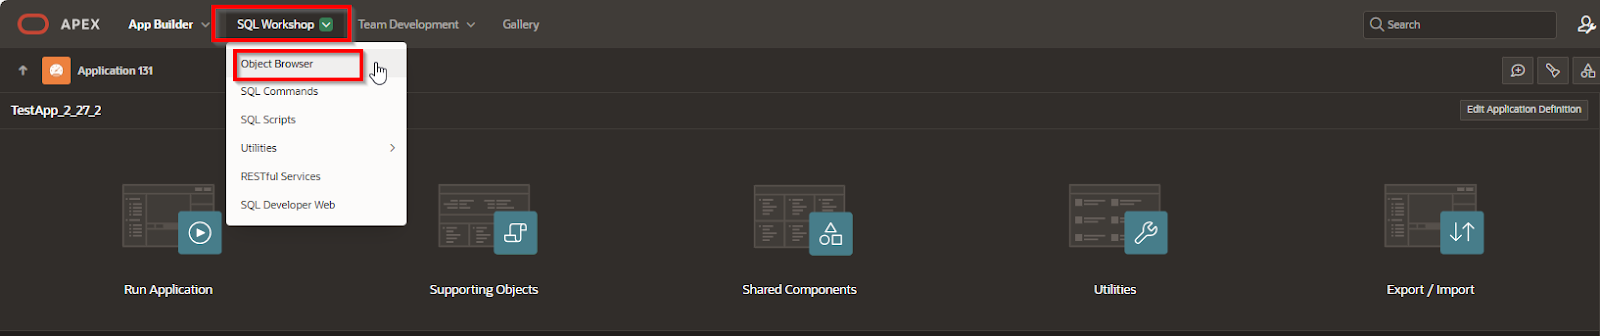
  2. From the APEX home screen, go to SQL Workshop.

  3. Click on Object Browser.

  4. You’ll see a list of existing database objects on the left panel, including tables, views, indexes, and more.

Creating a New Table

  1. In the Object Browser toolbar, click Create.

  2. Select Table from the list of options.

  3. Enter a name for your new table. Use uppercase (e.g., EMPLOYEES) to follow common Oracle naming standards.

  4. Click Next to begin defining your columns.

Defining Table Columns
For each column, you need to specify several properties:

  • Column Name (e.g., EMP_ID, FIRST_NAME, SALARY)

  • Data Type

    • VARCHAR2(size) for text

    • NUMBER(p,s) for numeric values

    • DATE for date fields

    • CLOB for large text content

  • Primary Key checkbox if the column will uniquely identify records

  • Not Null checkbox if the column should always have a value

  • Default Value (optional)

Example Column Configuration

Column Name Data Type Primary Key Not Null Default Value
EMP_ID NUMBER(10) Yes Yes Auto-increment
FIRST_NAME VARCHAR2(50) No Yes
LAST_NAME VARCHAR2(50) No Yes
SALARY NUMBER(8,2) No No 0.00
HIRE_DATE DATE No No SYSDATE

You can add as many columns as needed. Click Add Column to continue adding fields.

Setting Primary Keys and Constraints

  • Use the checkbox next to a column to set it as the Primary Key.

  • If using an auto-incrementing ID, select Identity Column for the ID field.

  • Click Constraints if you want to apply advanced rules:

    • Unique: Ensure column values are not duplicated.

    • Check: Define a condition (e.g., SALARY > 0).

    • Foreign Key: Link a column to a key in another table.

Saving the Table

  1. After defining all fields and constraints, click Next.

  2. Review the structure summary.

  3. Click Create to build the table.

Your new table will now be listed in the Object Browser.

Verifying the Table
To confirm that the table was created correctly:

  • Click on the table name in the Object Browser.

  • Click the Columns tab to inspect the structure.

  • Click the Data tab to view or insert sample records.

Using the Object Browser makes it easy to define and manage your database schema directly in Oracle APEX, without writing a single line of SQL. It’s a powerful tool for developers who want a fast and clear way to build tables and enforce data rules.

Inserting Data into the Table

You can manually add records using the Data tab in the Object Browser:

  1. Click on Data.

  2. Click Insert Row.

  3. Enter values for each column.

  4. Click Apply Changes.

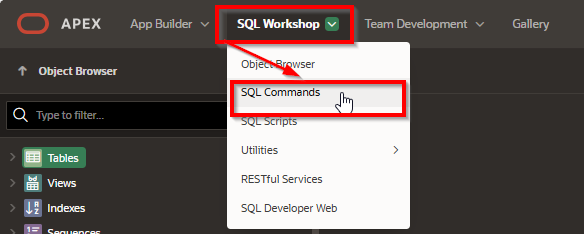
Alternatively, use SQL Commands in SQL Workshop:

INSERT INTO EMPLOYEES (EMP_ID, FIRST_NAME, LAST_NAME, SALARY, HIRE_DATE)  

VALUES (1, 'John', 'Doe', 50000, SYSDATE);


Modifying an Existing Table

To modify a table after creation:

  1. In Object Browser, select the table.

  2. Click Edit to add, remove, or modify columns.

  3. Click Apply Changes when finished.

Example Modifications:

  • Adding a new column: 

ALTER TABLE EMPLOYEES ADD DEPARTMENT_ID NUMBER(5);

  • Modifying a column's data type: 

ALTER TABLE EMPLOYEES MODIFY SALARY NUMBER(10,2);

  • Dropping a column: 

ALTER TABLE EMPLOYEES DROP COLUMN DEPARTMENT_ID;


Best Practices

  • Use meaningful table and column names for readability.

  • Define constraints to ensure data integrity.

  • Use appropriate data types to optimize storage and performance.

  • Test queries in SQL Workshop before applying changes.


The Object Browser in Oracle APEX provides an easy way to create and manage database tables.

  • You can define columns, constraints, and relationships without writing SQL.

  • Data can be inserted manually or using SQL commands.

  • The table structure can be modified as needed.

This method is ideal for developers who prefer a graphical interface for database management while still maintaining full control over their schema.


DATA for CREATING TABLE

Create Table “Persons”

CREATE TABLE Persons (

    First_Name VARCHAR(50),

    Last_Name VARCHAR(50),

    Address VARCHAR(100),

    City VARCHAR(50),

    Name_Of_State VARCHAR(50),

    ZIPcode VARCHAR(10)

);


INSERT INTO Persons (First_Name, Last_Name, Address, City, Name_Of_State) VALUES ('John', 'Doe', '123 Main St', 'Springfield', 'California'); COMMIT;

INSERT INTO Persons (First_Name, Last_Name, Address, City, Name_Of_State) VALUES ('Jane', 'Smith', '456 Oak Ave', 'Denver', 'Colorado'); COMMIT;

INSERT INTO Persons (First_Name, Last_Name, Address, City, Name_Of_State) VALUES ('Michael', 'Johnson', '789 Pine Rd', 'Austin', 'Texas'); COMMIT;

INSERT INTO Persons (First_Name, Last_Name, Address, City, Name_Of_State) VALUES ('Emily', 'Davis', '101 Maple Ln', 'Seattle', 'Washington'); COMMIT;

INSERT INTO Persons (First_Name, Last_Name, Address, City, Name_Of_State) VALUES ('Robert', 'Brown', '202 Birch Blvd', 'Miami', 'Florida'); COMMIT;

INSERT INTO Persons (First_Name, Last_Name, Address, City, Name_Of_State) VALUES ('Sarah', 'Miller', '303 Cedar Ct', 'Chicago', 'Illinois'); COMMIT;

INSERT INTO Persons (First_Name, Last_Name, Address, City, Name_Of_State) VALUES ('David', 'Wilson', '404 Elm Dr', 'New York', 'New York'); COMMIT;

INSERT INTO Persons (First_Name, Last_Name, Address, City, Name_Of_State) VALUES ('Jessica', 'Moore', '505 Spruce Way', 'Portland', 'Oregon'); COMMIT;

INSERT INTO Persons (First_Name, Last_Name, Address, City, Name_Of_State) VALUES ('Daniel', 'Taylor', '606 Aspen Pl', 'Atlanta', 'Georgia'); COMMIT;

INSERT INTO Persons (First_Name, Last_Name, Address, City, Name_Of_State) VALUES ('Laura', 'Anderson', '707 Walnut St', 'Phoenix', 'Arizona'); COMMIT;


How Do I Create The State Table

A screenshot of a computer

AI-generated content may be incorrect.


A screenshot of a computer

AI-generated content may be incorrect.


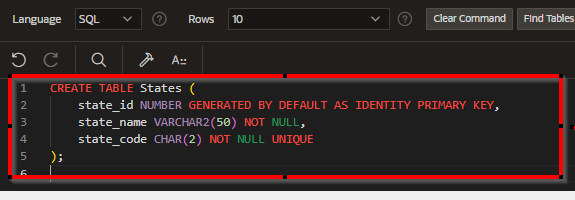
CREATE TABLE States (

    state_id NUMBER GENERATED BY DEFAULT AS IDENTITY PRIMARY KEY,

    state_name VARCHAR2(50) NOT NULL,

    state_code CHAR(2) NOT NULL UNIQUE

);


A screenshot of a computer program

AI-generated content may be incorrect.


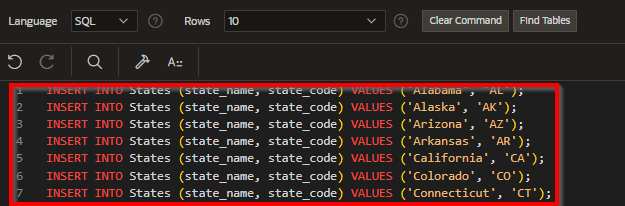
INSERT INTO States (state_name, state_code) VALUES ('Alabama', 'AL');

INSERT INTO States (state_name, state_code) VALUES ('Alaska', 'AK');

INSERT INTO States (state_name, state_code) VALUES ('Arizona', 'AZ');

INSERT INTO States (state_name, state_code) VALUES ('Arkansas', 'AR');

INSERT INTO States (state_name, state_code) VALUES ('California', 'CA');

INSERT INTO States (state_name, state_code) VALUES ('Colorado', 'CO');

INSERT INTO States (state_name, state_code) VALUES ('Connecticut', 'CT');

INSERT INTO States (state_name, state_code) VALUES ('Delaware', 'DE');

INSERT INTO States (state_name, state_code) VALUES ('Florida', 'FL');

INSERT INTO States (state_name, state_code) VALUES ('Georgia', 'GA');

INSERT INTO States (state_name, state_code) VALUES ('Hawaii', 'HI');

INSERT INTO States (state_name, state_code) VALUES ('Idaho', 'ID');

INSERT INTO States (state_name, state_code) VALUES ('Illinois', 'IL');

INSERT INTO States (state_name, state_code) VALUES ('Indiana', 'IN');

INSERT INTO States (state_name, state_code) VALUES ('Iowa', 'IA');

INSERT INTO States (state_name, state_code) VALUES ('Kansas', 'KS');

INSERT INTO States (state_name, state_code) VALUES ('Kentucky', 'KY');

INSERT INTO States (state_name, state_code) VALUES ('Louisiana', 'LA');

INSERT INTO States (state_name, state_code) VALUES ('Maine', 'ME');

INSERT INTO States (state_name, state_code) VALUES ('Maryland', 'MD');

INSERT INTO States (state_name, state_code) VALUES ('Massachusetts', 'MA');

INSERT INTO States (state_name, state_code) VALUES ('Michigan', 'MI');

INSERT INTO States (state_name, state_code) VALUES ('Minnesota', 'MN');

INSERT INTO States (state_name, state_code) VALUES ('Mississippi', 'MS');

INSERT INTO States (state_name, state_code) VALUES ('Missouri', 'MO');

INSERT INTO States (state_name, state_code) VALUES ('Montana', 'MT');

INSERT INTO States (state_name, state_code) VALUES ('Nebraska', 'NE');

INSERT INTO States (state_name, state_code) VALUES ('Nevada', 'NV');

INSERT INTO States (state_name, state_code) VALUES ('New Hampshire', 'NH');

INSERT INTO States (state_name, state_code) VALUES ('New Jersey', 'NJ');

INSERT INTO States (state_name, state_code) VALUES ('New Mexico', 'NM');

INSERT INTO States (state_name, state_code) VALUES ('New York', 'NY');

INSERT INTO States (state_name, state_code) VALUES ('North Carolina', 'NC');

INSERT INTO States (state_name, state_code) VALUES ('North Dakota', 'ND');

INSERT INTO States (state_name, state_code) VALUES ('Ohio', 'OH');

INSERT INTO States (state_name, state_code) VALUES ('Oklahoma', 'OK');

INSERT INTO States (state_name, state_code) VALUES ('Oregon', 'OR');

INSERT INTO States (state_name, state_code) VALUES ('Pennsylvania', 'PA');

INSERT INTO States (state_name, state_code) VALUES ('Rhode Island', 'RI');

INSERT INTO States (state_name, state_code) VALUES ('South Carolina', 'SC');

INSERT INTO States (state_name, state_code) VALUES ('South Dakota', 'SD');

INSERT INTO States (state_name, state_code) VALUES ('Tennessee', 'TN');

INSERT INTO States (state_name, state_code) VALUES ('Texas', 'TX');

INSERT INTO States (state_name, state_code) VALUES ('Utah', 'UT');

INSERT INTO States (state_name, state_code) VALUES ('Vermont', 'VT');

INSERT INTO States (state_name, state_code) VALUES ('Virginia', 'VA');

INSERT INTO States (state_name, state_code) VALUES ('Washington', 'WA');

INSERT INTO States (state_name, state_code) VALUES ('West Virginia', 'WV');

INSERT INTO States (state_name, state_code) VALUES ('Wisconsin', 'WI');

INSERT INTO States (state_name, state_code) VALUES ('Wyoming', 'WY');


A screenshot of a computer

AI-generated content may be incorrect.


A black rectangular object with a black rectangle

AI-generated content may be incorrect.

Conclusion

The Object Browser in Oracle APEX offers a simple yet powerful way to create and manage database tables. Whether you're building a new application or expanding an existing one, the visual tools allow you to quickly set up tables with all the necessary fields and constraints. It’s an excellent option for both beginners and experienced users who want to streamline their development workflow without switching between environments.

How Do I Use a Static LOV in a dropdown page

 Introduction

Using a static List of Values (LOV) in a dropdown page in Oracle APEX allows you to present a fixed set of options to users in a select list. This is especially useful for fields like categories, status indicators, or levels where the choices don’t change frequently. Static LOVs improve data consistency and simplify form design by eliminating the need for dynamic SQL queries. In this blog, you’ll learn how to create and apply a static LOV to a dropdown list in a form page.

To use a static List of Values (LOV) in a dropdown page in Oracle APEX, you define a fixed set of label-value pairs that populate a select list. This type of LOV is ideal for situations where the options do not need to be pulled from a database, such as status values like "Open", "In Progress", or "Closed". Here's how to set it up step by step.

Step 1: Open Your Application and Go to the Target Page
Open Oracle APEX, select your application, and navigate to the page where you want to place the dropdown. You can use an existing form page or create a new one.

Step 2: Add a Select List Item
In Page Designer:

  • Under the appropriate region, click + to add a new item.

  • Choose Select List as the item type.

  • Set the item name, such as P1_STATUS.

  • Set the label, such as Status.

Step 3: Define the Static LOV
With the P1_STATUS item selected:

  • Scroll to the List of Values section.

  • For Type, choose Static Values.

  • In the Static Values box, enter values in this format:

Open;OPEN  
In Progress;IN_PROGRESS  
Closed;CLOSED

Each line represents one option, where the text before the semicolon is what users see (label), and the text after is what gets submitted (value).

Step 4: Configure Optional Settings
You can fine-tune how the dropdown behaves:

  • Display Null Value: Turn on if you want to show a blank first option like - Select -.

  • Null Display Value: Set the label for the blank option, e.g., - Select Status -.

  • Session State: Ensure session state is enabled so the selected value is stored and available to processes or conditions.

Step 5: Save and Run the Page
Click Save, then Run the page. You should now see a dropdown that shows the static options defined earlier.

Example Use Case
A common use of a static LOV dropdown is for selecting a risk level:

Low;LOW  
Medium;MEDIUM  
High;HIGH

This lets users pick a level easily without pulling values from a table.

Benefits of Using Static LOVs

  • Fast to implement

  • No dependency on database queries

  • Easy to maintain for small sets of fixed options

  • Great for select lists, radio groups, or checkbox groups

Static LOVs are ideal for dropdowns with consistent values across the application, giving you a simple, clean method to control user input.

Add a “select one” dropdown box and attach a “Shared components” list of values

A screen shot of a graph

Description automatically generated

Here is how it looks on the page

A screenshot of a computer

Description automatically generated

Conclusion
Implementing a static LOV in a dropdown list is a quick and effective way to guide users toward consistent input. It ensures valid selections, streamlines form usability, and reduces development complexity when dealing with predefined values. Oracle APEX makes it easy to create and assign static LOVs, allowing you to build cleaner and more user-friendly applications.

How Do I Create a static LOV (Additional Example )

 Introduction

Creating a static List of Values (LOV) in Oracle APEX is a simple and effective way to present users with a predefined set of options. Static LOVs are ideal for selections that rarely change, such as categories, status types, or fixed ratings. This method improves data accuracy and speeds up data entry by eliminating manual input errors. In this example, we’ll walk through how to create an additional static LOV and assign it to a form item.

Creating a static LOV (List of Values) in Oracle APEX is useful when you need to present users with a fixed set of options that do not change often. These types of LOVs are ideal for fields like status types, priority levels, or predefined categories. Let’s walk through an additional example where we create a static LOV for selecting a risk level in a form.

Step 1: Go to Shared Components
From your APEX application:

  • Open your app in the APEX development environment.

  • Navigate to the Shared Components section.

  • Under User Interface, click on List of Values.

Step 2: Create a New Static LOV

  • Click Create > From Scratch.

  • Enter a name for the LOV, for example: LOV_Risk_Levels.

  • Under Type, select Static.

  • Add your values manually in the Static Values section.
    For this example, enter the following:

    • Label: Low Risk, Value: LOW

    • Label: Medium Risk, Value: MEDIUM

    • Label: High Risk, Value: HIGH

  • Click Create LOV to save.

Step 3: Assign the Static LOV to a Page Item
Now that the LOV is created, assign it to a form item on your page.

  • Go to Page Designer for the target page (for example, a form page).

  • Create or select an existing page item such as P1_RISK_LEVEL.

  • Set the Type to Select List, Radio Group, or Popup LOV, depending on your preference.

  • Under List of Values, choose LOV_Risk_Levels.

  • You can optionally enable Display Null Value if you want a blank option at the top.

  • Set Label, Session State, and other settings as needed.

  • Save and run the page.

Result
Your page item now displays a list with three options: Low Risk, Medium Risk, and High Risk. When a user selects one, the corresponding value (LOW, MEDIUM, or HIGH) is stored in the database or submitted with the form.

Optional Enhancement: Inline Static LOV
Alternatively, you can define a static LOV directly in the item properties without using Shared Components:

  • Go to the page item (e.g., P1_RISK_LEVEL).

  • Set Type to Select List.

  • Under List of Values, choose Static Values.

  • Enter the values in this format:

Low Risk;LOW  
Medium Risk;MEDIUM  
High Risk;HIGH
  • Save and test.

This inline method is quicker for one-time or page-specific use, while the Shared Components method is reusable and centralized.

Creating static LOVs in Oracle APEX is fast, flexible, and ideal for consistent input where the options are known and fixed.

Example

Select the create list of values option from the Shared components > List of Values link

Select build “From Scratch”

A screenshot of a computer

AI-generated content may be incorrect.

Give the LOV a name

A screenshot of a computer

Description automatically generated


Add the static values that you desire

A screenshot of a computer

Description automatically generated

Complete and VOILA!


Conclusion
Static LOVs are an easy way to manage fixed option sets within your Oracle APEX applications. They enhance form usability, standardize user input, and require minimal maintenance. By using static LOVs where appropriate, you can simplify development and ensure that users consistently select from the correct list of values.

How Do I Use Cascading LOVs (Parent-Child Relationship)

 Introduction

Cascading LOVs in Oracle APEX allow you to create a parent-child relationship between two select lists or other LOV-based components. When the user selects a value in the parent list, the child list is automatically filtered based on that selection. This approach makes forms more dynamic and user-friendly by narrowing down options, preventing invalid combinations, and improving data accuracy. In this blog, we’ll walk through how to set up cascading LOVs step by step in an APEX form.

Using cascading LOVs (List of Values) in Oracle APEX is an effective way to filter one select list based on the user’s choice in another. This parent-child relationship between LOVs enhances usability and helps enforce data consistency. Let’s walk through how to set up cascading LOVs using a practical example where a user first selects a region, then selects an earthquake event from that region.

Step 1: Create the Parent LOV (Region)
First, we need a list of available regions for the user to choose from.

  1. Go to Shared Components > List of Values.

  2. Click Create > From Scratch.

  3. Name the LOV: LOV_Regions.

  4. Choose Dynamic as the source type.

  5. Enter the following SQL query:

SELECT DISTINCT REGION AS display_value, REGION AS return_value  
FROM USCG_DATA  
ORDER BY REGION;
  1. Save the LOV.

Next, assign this LOV to a select list item on your page:

  • Go to the desired page in Page Designer.

  • Create or select a page item named P1_REGION.

  • Set the Type to Select List.

  • In the List of Values section, select LOV_Regions.

  • Save your changes.

Step 2: Create the Child LOV (Earthquake Events Based on Region)
Now, you will create the second LOV, which filters events based on the region selected in P1_REGION.

  1. Go to Shared Components > List of Values.

  2. Click Create > From Scratch.

  3. Name this LOV: LOV_Earthquake_Events_By_Region.

  4. Choose Dynamic as the source type.

  5. Enter the following SQL:

SELECT PROPERTIES_TITLE AS display_value, ID AS return_value  
FROM USCG_DATA  
WHERE REGION = :P1_REGION  
ORDER BY PROPERTIES_TITLE;
  1. Save the LOV.

Next, assign this LOV to a second page item:

  • In Page Designer, create or select the page item P1_EVENT_ID.

  • Set the Type to Select List, Popup LOV, or another LOV-compatible item.

  • In the List of Values section, choose LOV_Earthquake_Events_By_Region.

  • Set the Cascading LOV Parent Item to P1_REGION.

  • Enable Submit when Value Changed on the P1_REGION item to refresh dependent items.

  • Set P1_EVENT_ID to Refresh when P1_REGION changes (can be done using a Dynamic Action or automatic cascade option).

  • Save and run your page.

Now, when a user selects a region, the second dropdown will automatically filter to show only the earthquake events for that region.

Final Notes
Cascading LOVs are an essential part of building interactive Oracle APEX applications. They allow you to:

  • Control the flow of user input

  • Reduce errors by narrowing user choices

  • Connect related data fields logically and cleanly

Use Static LOVs for fixed options, Dynamic LOVs for query-driven lists, and Cascading LOVs when one list’s values depend on another. With these techniques, you can build forms that are not only functional but also user-friendly and intelligent.

In the application, select “Shared components”

A screenshot of a computer

AI-generated content may be incorrect.

Select the “Other Components” > “List of Values”

A screenshot of a computer

Description automatically generated


Select  and click on “Create” to create a List of Value “LOV”

A black screen with yellow text

Description automatically generated


Select from Scratch

A screenshot of a computer

Description automatically generated


Name the LOV

A screenshot of a computer

Description automatically generated


Select how you want the list to be filled.

A screenshot of a computer

Description automatically generated


Identify what you want to display…this is from the DEPT table

A screenshot of a computer

Description automatically generated


Finally there is a LOV that can be used in the Form’s controls.

A screenshot of a computer

Description automatically generated


Conclusion

Using cascading LOVs in Oracle APEX helps streamline user input by dynamically filtering available options based on earlier selections. This technique not only improves usability but also ensures better control over data entry. By implementing a parent-child LOV relationship, you create a more intuitive and responsive interface that adjusts in real time to user choices.

How Do I Create a List of Values (LOV) in Oracle APEX

Introduction

Creating a List of Values (LOV) in Oracle APEX is a fundamental technique for building interactive and user-friendly applications. LOVs provide users with predefined options to choose from, making data entry faster, more accurate, and consistent. Whether you need a simple static list or a dynamic list sourced from your database, Oracle APEX offers flexible methods to create and manage LOVs. This blog will guide you through the process of creating LOVs and using them effectively in your applications.

 Introduction to List of Values (LOV) in Oracle APEX

A List of Values (LOV) in Oracle APEX is a set of predefined options—either static or dynamic—that populate components such as select lists, radio groups, checkbox groups, popup LOVs, and more. LOVs simplify user input by allowing users to choose from a controlled list of values, enhancing both usability and data accuracy.

Types of LOVs in Oracle APEX
Oracle APEX offers several types of LOVs, including:

  • Static LOV: Values are manually specified within APEX.

  • Dynamic LOV: Values are retrieved dynamically through database queries.

  • Shared LOV: LOVs that are created once and can be reused across multiple components throughout the application.

To create both static and dynamic Lists of Values (LOVs) in Oracle APEX, follow this step-by-step guide. We’ll use a practical example based on a table named USCG_DATA, which stores earthquake event information. Our goal is to let users select an event using a dropdown list that shows the event title but stores its corresponding ID in the database.

Step 1: Create a Dynamic LOV in Oracle APEX
Dynamic LOVs retrieve their values directly from a SQL query. This is useful when you want the list to reflect up-to-date data from your tables.

  1. Open your application in Oracle APEX.

  2. Go to Shared Components > List of Values.

  3. Click Create > From Scratch.

  4. Enter the LOV name:
    LOV_Earthquake_Events

  5. For Type, select Dynamic.

  6. In Source Type, choose SQL Query and enter the following SQL:

SELECT PROPERTIES_TITLE AS display_value, ID AS return_value  
FROM USCG_DATA  
ORDER BY PROPERTIES_TITLE;
  • PROPERTIES_TITLE is what the user will see in the dropdown.

  • ID is the value stored in the database.

  1. Click Create LOV to save.

Step 2: Use the LOV in a Page Item
Now, attach the LOV to a page item, such as a select list on a form.

  1. Open a form page in your application.

  2. In the Page Designer, add a new page item or select an existing one.

  3. Set Type to Select List, Popup LOV, or another LOV-supported item type.

  4. Set the Name to something like P1_EVENT_ID.

  5. Under the List of Values section, select LOV_Earthquake_Events.

  6. Optionally, enable Display Extra Values if the selected value might not always be present in the LOV source.

  7. Save and run the page.
    Now, the dropdown will show earthquake titles but store their corresponding IDs in the database.

Step 3: Create a Static LOV
Static LOVs are useful when your list contains a fixed set of values that won’t change often.

  1. Go to Shared Components > List of Values.

  2. Click Create > Static Values.

  3. Enter the LOV name (e.g., LOV_Magnitude_Levels).

  4. Add your static entries:

    • Label: Low Magnitude, Value: LOW

    • Label: Medium Magnitude, Value: MEDIUM

    • Label: High Magnitude, Value: HIGH

  5. Click Create LOV to save.

To use this static LOV:

  1. Go to a form page in Page Designer.

  2. Add a new page item or select an existing one.

  3. Choose Select List, Radio Group, or Checkbox Group as the item type.

  4. Set the List of Values to the newly created static LOV (LOV_Magnitude_Levels).

  5. Save and run the page.

Both types of LOVs help streamline user input, reduce entry errors, and provide a consistent interface for selecting data. Static LOVs are simple and fast to configure, while dynamic LOVs offer flexibility and automatic updates as your data changes.

Conclusion
By creating and using Lists of Values in Oracle APEX, you enhance the user experience and ensure data consistency throughout your application. Whether static or dynamic, LOVs simplify user input and reduce errors by limiting choices to valid options. Mastering LOV creation empowers you to build more intuitive, efficient, and professional Oracle APEX applications.

How Do I Make a Faceted Search Map Page in Oracle APEX

Combining faceted search with a map region in Oracle APEX enables users to filter data visually and spatially at the same time. This design ...