Search This Blog

Tuesday, July 1, 2025

How do I Create a REST Data Source in APEX

 Introduction

In Oracle APEX, creating a REST Data Source allows your application to interact with external or internal RESTful services, bringing in live data without the need to store it in your local database. This is especially useful when working with cloud APIs, microservices, or shared enterprise data sources. By defining a REST Data Source, you can display, search, and even manipulate external data directly within APEX components like reports, charts, and forms. This approach supports modern, dynamic application development where real-time data access and integration are key.

To create a REST Data Source in Oracle APEX, follow these detailed steps. A REST Data Source allows your APEX application to query external RESTful web services as if they were local database tables. This is particularly useful when integrating cloud services, third-party APIs, or Oracle REST-enabled SQL.

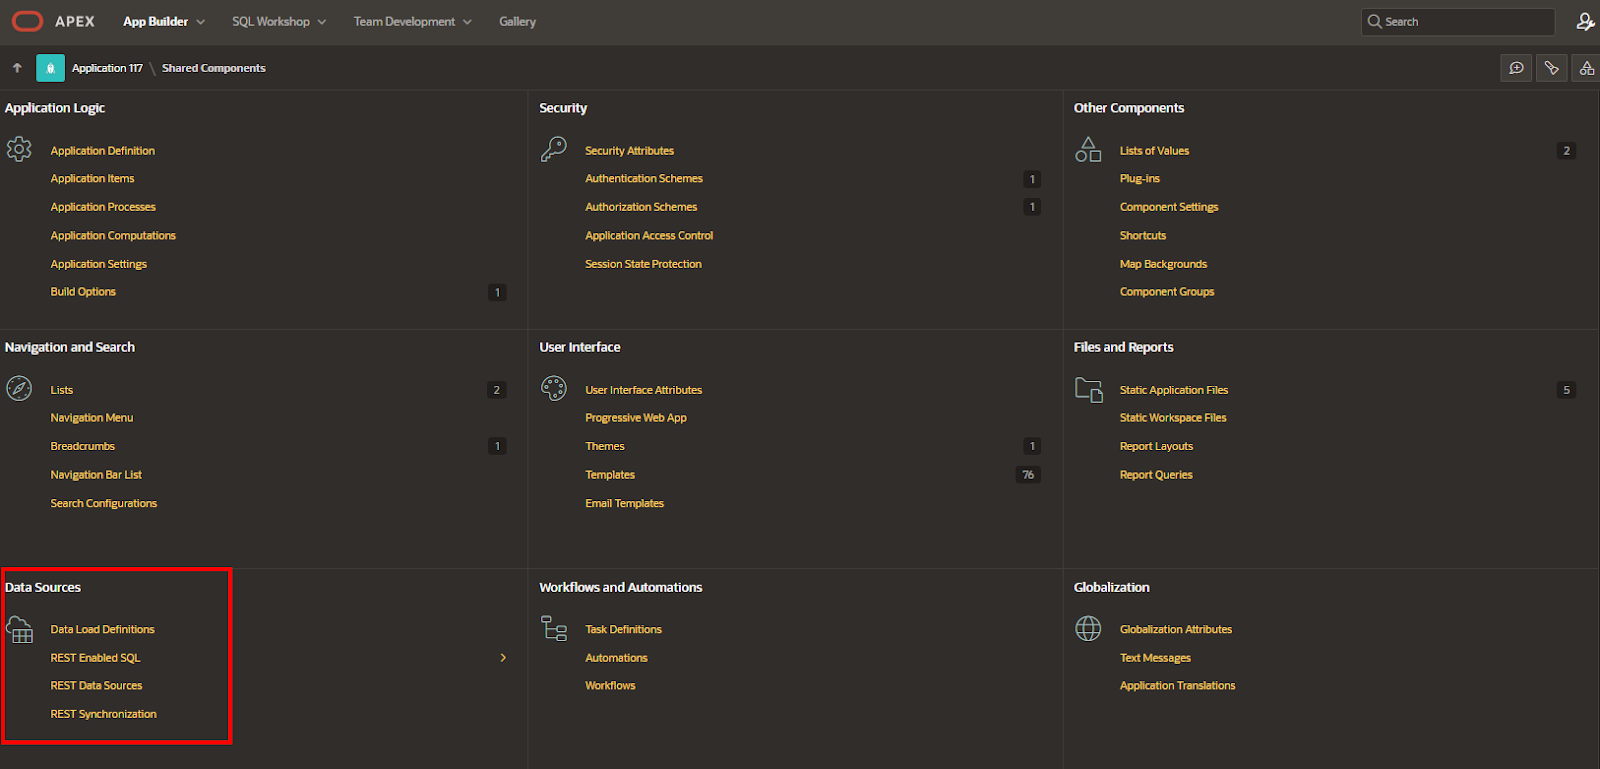
  1. Open APEX and Access Shared Components
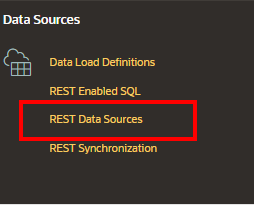
    Start by opening your APEX application. From the application home screen, click on Shared Components in the side menu. Under the Data Sources section, select REST Data Sources.

  2. Create a New REST Data Source
    Click on the Create button to begin the REST Data Source wizard. You will be prompted to select the type of REST Data Source. You can choose from:

    • Web Source (for external REST APIs),

    • Oracle REST Data Services (ORDS),

    • or Remote SQL (for querying remote Oracle databases).

  3. Enter the REST Endpoint URL
    Provide the RESTful endpoint URL. For example, if integrating a weather API:

    https://api.weatherapi.com/v1/current.json?q=NewYork&key=yourapikey
    

    You can also parameterize the URL to accept bind variables.

  4. Set HTTP Method and Authentication
    Choose the HTTP method, usually GET for data retrieval.
    Under Authentication, choose one of the following depending on the API:

    • None (if public),

    • Basic Authentication (username/password),

    • OAuth2 (for token-based APIs),

    • HTTP Header (for APIs requiring API keys or tokens in headers).
      Define any required HTTP headers, query parameters, or authentication tokens.

  5. Test the Connection
    Click on the Test button to make sure your API call works and returns data. If the test is successful, APEX will analyze the response and attempt to detect the JSON or XML structure.

  6. Configure Response Structure
    APEX will allow you to select the data structure that represents the rows of your virtual table. This is typically a JSON array within the API response. For example, from:

    { "weather": [ { "city": "New York", "temp": "85" } ] }
    

    you would select weather as the data path.

  7. Define Columns and Data Types
    APEX will automatically detect the fields and assign data types based on the sample response. You can rename columns, assign friendly labels, and adjust data types if needed.

  8. Finish and Save the REST Data Source
    Review the summary screen and click Create REST Data Source. You now have a REST Data Source available in your application.

  9. Use the REST Data Source in Components
    You can now use this REST Data Source in Classic Reports, Interactive Reports, Charts, and more. When creating a region, choose REST Data Source as the data source type and select the one you created.

  10. Optional: Add Filters and Parameters
    You can create bind variables in your URL to make the REST call dynamic. For instance, replacing a fixed city with a page item:

https://api.weatherapi.com/v1/current.json?q=&P1_CITY.&key=yourapikey

You can also configure pagination if the API supports it.

Using REST Data Sources effectively brings external data directly into APEX without replication. It’s a powerful method to make your application more dynamic, scalable, and integrated with modern services.

  1. Navigate to REST Data Sources:

    • Access the APEX App Builder.

    • Select the desired application.

    • Go to Shared Components.

A screenshot of a computer

AI-generated content may be incorrect.

  • Click on REST Data Sources.
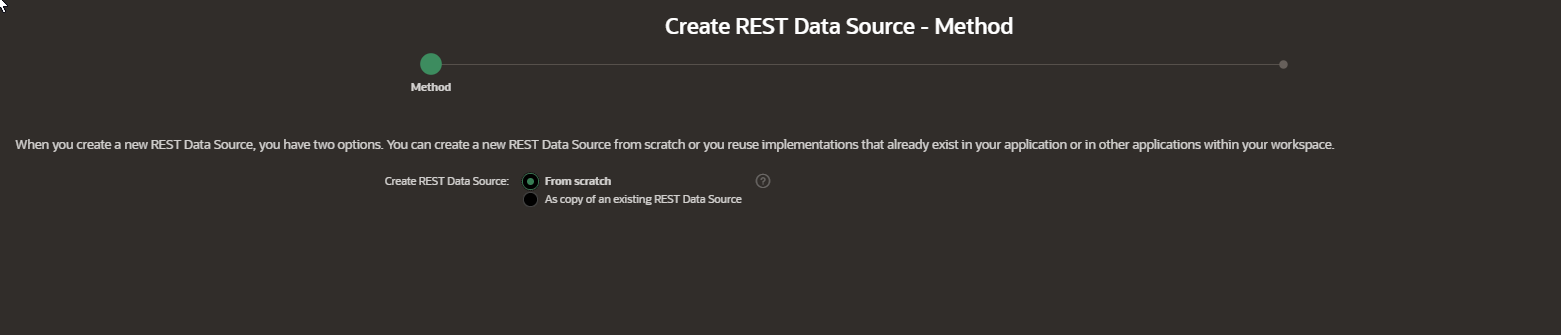
A screenshot of a computer

AI-generated content may be incorrect.

  1. Initiate Creation:

    • Click the Create button.

  • Choose From Scratch and proceed.

A screenshot of a computer

AI-generated content may be incorrect.

Conclusion
Creating a REST Data Source in APEX enables you to build responsive, data-driven applications that communicate seamlessly with other systems. With just a few configuration steps, you can pull in external data, authenticate securely, and use that data across your APEX pages. Whether you're consuming a public API or integrating with enterprise systems, REST Data Sources provide the flexibility and power to expand your application's capabilities far beyond the local Oracle database.

APEX REST Data Source

 Introduction

In Oracle APEX, REST Data Sources provide a seamless way to integrate external or internal web services directly into your applications. By using RESTful services, you can consume data from remote systems, APIs, or cloud platforms without having to import or replicate data locally. This not only enhances flexibility but also ensures data consistency and real-time access. APEX makes it easy to define, configure, and use REST Data Sources in reports, charts, forms, and more—enabling developers to build robust and data-rich applications efficiently.

In Oracle APEX, a REST Data Source allows developers to integrate and work with data exposed by RESTful web services directly within APEX components like reports, forms, and charts. This means you can build applications that interact with external APIs or internal RESTful services without needing to replicate or store data in the local database. REST Data Sources provide a powerful mechanism to extend the functionality of APEX applications by bridging the gap between APEX and other data systems or platforms.

To create and use a REST Data Source, navigate to Shared Components in your APEX application. Under Data Sources, choose REST Data Sources and click Create. You’ll have the option to create a REST Data Source manually or by using a Swagger/OpenAPI specification. When creating the source manually, you'll need to provide a Web Source Name, Endpoint URL, and optionally, configure authentication if the REST service requires credentials (such as OAuth2, Basic Auth, or API Keys). APEX allows you to define the request method (GET, POST, etc.), add headers or parameters, and test the REST call directly within the setup screen.

Once defined, REST Data Sources can be consumed in various components. For example, when building an Interactive Report, you can choose REST Data Source as the data source type. APEX automatically maps the returned JSON structure to columns, allowing you to define display settings just like with a traditional SQL-based report. If needed, developers can also define transformations or filtering using SQL-like syntax with the APEX_JSON package or by using SQL Workshop's RESTful SQL features.

You can also bind REST Data Sources to Forms, enabling users to view or update data from external services, assuming the web service supports POST, PUT, or DELETE operations. This requires a more detailed setup where you map form items to JSON fields and define the correct request body formats.

REST Data Sources also support pagination, filtering, and sorting, either on the server side (if the API supports it) or locally within the APEX component. Developers can fine-tune how much data is retrieved and displayed, optimizing performance and responsiveness.

Additionally, APEX provides Web Source Modules as reusable wrappers around REST Data Sources. You can create a Web Source Module that defines endpoints, parameters, and response templates once, and reuse it across multiple pages or components in your app.

REST Data Sources in Oracle APEX make it easier than ever to build dynamic, data-rich applications that work seamlessly with remote systems and APIs. With intuitive setup, secure integration options, and native support across the APEX framework, REST Data Sources unlock a new level of flexibility and scalability for modern application development.

In APEX, a REST Data Source enables developers to seamlessly incorporate external RESTful web services or JSON data feeds into their applications. This functionality allows for the integration of external data into APEX components such as Classic Reports, Interactive Reports, Calendars, and JET Charts.

Types of REST Data Sources in APEX:

  • Simple HTTP: Designed for straightforward HTTP data feeds where all data is retrieved in a single request. This type assumes the server does not support advanced features like server-side filtering or ordering, requiring manual configuration of invocation details and parameters.

  • Oracle REST Data Services (ORDS): Targets REST services adhering to Oracle's REST standards, supporting standardized operations (GET, POST, PUT, DELETE). These services facilitate server-side filtering and ordering, allowing APEX to delegate report sorting and filtering to the REST service.

Conclusion
APEX REST Data Sources open up powerful integration capabilities for developers, allowing applications to connect dynamically to remote data with minimal effort. Whether pulling in data from external APIs or internal microservices, REST Data Sources make it easy to extend APEX apps beyond the database. With secure authentication options and native support across APEX components, RESTful integration is a critical tool for modern, scalable application development.

How do I Create Enhance Tree Reports with JavaScript

 Creating enhanced Tree Reports in Oracle APEX using JavaScript allows developers to add advanced interactivity and customization beyond the default capabilities. By leveraging JavaScript, you can control node behavior, add custom icons, implement dynamic loading, or create complex event handling to improve the user experience. This blog will guide you through the process of integrating JavaScript into your Tree Reports to make them more responsive and user-friendly.

Creating enhanced Tree Reports in Oracle APEX with JavaScript involves adding custom scripts to extend the default behavior and appearance of tree components. JavaScript enables you to control how nodes expand or collapse, change icons dynamically, respond to user interactions, and even load data asynchronously for better performance.

To begin, after creating your basic Tree Report region based on a SQL query returning hierarchical data, navigate to the region's attributes or the page's JavaScript section. You can write custom JavaScript code that hooks into the tree’s event lifecycle. For example, you can use APEX’s built-in JavaScript APIs like apex.tree or jQuery selectors to find and manipulate tree nodes.

One common enhancement is customizing node icons based on node attributes. You can write JavaScript that iterates over tree nodes after rendering and changes the icons or styles conditionally. Another advanced technique is adding event handlers to nodes so that when users click a node, a custom action occurs, such as opening a detail page or showing a tooltip.

Additionally, you can implement lazy loading of child nodes via JavaScript by hooking into tree expansion events and loading data asynchronously from the server, improving load time for large hierarchies.

To add JavaScript, go to the Page Designer > JavaScript section, and include your code in the "Function and Global Variable Declaration" or "Execute when Page Loads" areas, ensuring it interacts with the tree region’s DOM elements. Use browser developer tools to test and debug your scripts.

In summary, enhancing Tree Reports with JavaScript in Oracle APEX allows you to create richer, more interactive hierarchical data presentations. By customizing icons, adding event-driven behaviors, and optimizing data loading, you transform static tree structures into dynamic and user-friendly components that improve application usability and performance.

To automatically expand a specific node on page load, use the following JavaScript code in the Page JavaScript section:

apex.tree.expandNode('TREE_STATIC_ID', 3);

Replace TREE_STATIC_ID with your Tree Region Static ID and 3 with the node ID to expand.

Testing and Best Practices

  1. Run the page and verify that the tree loads correctly.

  2. Click different nodes to check if navigation works.

  3. Ensure large datasets use lazy loading to improve performance.

  4. If the tree structure does not display correctly, check the ID-PARENT_ID hierarchy in the table.

A Tree Report in Oracle APEX allows users to visualize hierarchical data interactively. By using SQL queries, navigation links, CSS styling, and JavaScript enhancements, you can create a powerful and user-friendly tree structure. This feature is particularly useful for organizational charts, file management systems, and category trees.

Tree Report EXAMPLE:


A screenshot of a computer

AI-generated content may be incorrect.


A screenshot of a computer

Description automatically generated


In conclusion, using JavaScript to enhance Tree Reports in Oracle APEX unlocks powerful possibilities for tailoring hierarchical data presentations to your application’s unique needs. With careful scripting, you can improve navigation, enrich visual elements, and add interactive features that elevate the overall usability of your application. Embracing JavaScript in this context transforms standard Tree Reports into dynamic, engaging components.

How do I Add Styling the Tree with CSS

 Using CSS to style your tree reports in Oracle APEX allows you to create visually appealing and user-friendly hierarchical displays. Customizing the appearance of tree nodes, lines, icons, and hover effects can greatly enhance the overall user experience by making the tree easier to navigate and more aligned with your application’s branding. This blog will guide you through the process of adding CSS styles to your tree components in APEX to achieve a polished and professional look.

Styling a Tree Report in Oracle APEX with CSS allows you to customize the look and feel of your hierarchical data, making it more visually appealing and easier to navigate. To add CSS styling to your tree, you first need to identify the CSS selectors used by the tree region. Oracle APEX tree components typically generate HTML elements with classes such as .a-Tree, .a-Tree-node, and .a-Tree-label which you can target in your CSS.

To begin, open your Oracle APEX application and navigate to the page containing your tree report. In the page designer, locate the tree region and under the “Appearance” section, find the “Custom CSS” attribute where you can directly add your CSS code, or alternatively, you can include CSS in the page’s Inline CSS section or in a shared CSS file if you want to reuse styles across multiple pages.

For example, to change the font size and color of the tree labels, you can use the following CSS code:

.a-Tree-label {
  font-size: 14px;
  color: #2A72D7;
  font-weight: bold;
}

If you want to customize the icons or expand/collapse indicators, target the .a-Tree-icon class. For instance:

.a-Tree-icon {
  color: #FF6600;
  font-size: 16px;
}

You can also add hover effects to highlight nodes when the user moves the mouse over them:

.a-Tree-node:hover {
  background-color: #E0F0FF;
  cursor: pointer;
}

To control indentation or spacing between nodes, you might adjust padding or margins of the .a-Tree-node elements. For example:

.a-Tree-node {
  padding-left: 20px;
}

Remember that your CSS changes are applied when the page renders, so after adding the styles, run your page and verify the tree looks as expected. If you need to override existing APEX styles, you might need to use the !important keyword or increase CSS selector specificity.

In summary, adding styling with CSS to your Oracle APEX tree reports involves targeting the correct CSS classes, adding your custom styles in the appropriate page or application-level CSS areas, and testing the results. This approach lets you create a more intuitive and branded navigation experience in your applications.

To improve the appearance of the tree, add custom CSS.

  1. Go to Shared ComponentsThemesCustom CSS.

  2. Add the following CSS code:

.a-TreeView .a-TreeView-node {

    font-size: 14px;

    padding: 5px;

}


.a-TreeView .a-TreeView-content:hover {

    background-color: #f4f4f4;

}


.a-TreeView .a-TreeView-content-selected {

    background-color: #0073e6;

    color: white;

}

Click Save and refresh the page.

By applying CSS to your tree reports, you gain full control over the visual presentation, enabling you to highlight important nodes, adjust spacing, and create custom icons or color schemes. With the flexibility offered by CSS, you can transform a basic tree into an engaging and intuitive navigation tool tailored to your users’ needs and preferences. Mastering tree styling is an important step toward building refined and effective Oracle APEX applications.

How do I Add Navigation to the Tree Nodes

 Adding navigation to tree nodes in Oracle APEX enhances user interaction by allowing each node to act as a clickable link that directs users to relevant pages or reports. This functionality is essential for creating intuitive hierarchical menus or data explorers where users can easily navigate through different levels of information. By configuring the tree report’s SQL query to include URLs or page references, and setting appropriate link attributes, developers can seamlessly integrate navigation within the tree structure.

In Oracle APEX, adding navigation to tree nodes allows users to click on a node and be directed to a specific page, report, or URL. This enhances the interactivity of your application by making tree nodes actionable links rather than just static labels.

To add navigation to tree nodes, you start by modifying the SQL query that generates the tree. This query must include a column for the node’s link target, typically using the LINK or TARGET column aliases that APEX expects. Here’s a step-by-step explanation:

  1. Identify the Tree Query
    The tree region in APEX is based on a SQL query that returns columns such as ID, PARENT_ID, DISPLAY_LABEL, and optionally, LINK. You need to extend this query to generate the URL or page reference for each node.

  2. Generate the Link URL
    Use APEX URL syntax to build links dynamically. For example, to navigate to page 10 and pass an ID as a parameter, you can use:

    SELECT
      node_id AS id,
      parent_node_id AS parent_id,
      node_name AS display_label,
      'f?p=' || :APP_ID || ':10:' || :APP_SESSION || '::NO::P10_NODE_ID:' || node_id AS link
    FROM
      your_tree_table
    

    This builds a URL for page 10, passing the node ID as a page item value P10_NODE_ID.

  3. Assign the Link Column
    In the Tree region attributes, ensure the "Link" column is set to the column you created in your SQL (LINK). This tells APEX to render the node label as a clickable link.

  4. Optional: Open Links in New Window or Modal
    You can specify additional HTML attributes or target behavior if needed. For example, add a target attribute to open links in a new tab or use dynamic actions to open modals.

  5. Test the Tree Navigation
    Run the page and click on the nodes to verify they redirect correctly. Ensure that the parameters passed allow the destination page to fetch and display the appropriate data.

By carefully crafting the SQL query and configuring the Tree region, you create an intuitive navigation structure where each tree node acts as a gateway to deeper content or functionality within your APEX application.

You can configure node clicks to open a details page for the selected department.

  1. In the Tree Attributes section, locate Node Link Target.

  2. Select Redirect to Page in this Application.

  3. Choose a Detail Form Page (e.g., a department details page).

  4. In Set Items, map the ID column to a page item (e.g., PXX_DEPT_ID).

  5. Save and run the page to test the navigation.

Adding navigation to tree nodes enhances user experience by simplifying access paths and organizing content logically. This technique is essential for creating complex, hierarchical applications that require smooth user flow across multiple pages or reports.

In conclusion, incorporating navigation into tree nodes significantly improves the usability of Oracle APEX applications by providing direct access to related content and features. Properly linked tree nodes enable users to move efficiently through complex datasets or application sections, making the overall experience more dynamic and user-friendly. Leveraging this capability allows developers to build powerful, interactive tree-based interfaces tailored to specific business needs.

How do I Customize the Tree Report

 Customizing the Tree Report in Oracle APEX allows developers to tailor the hierarchical data display to meet specific user needs and improve overall usability. By adjusting attributes such as node labels, icons, and expand/collapse behavior, you can create a more intuitive and visually appealing interface. Customization also includes modifying the SQL query to control the data structure and adding dynamic actions or styles to enhance interactivity and presentation.

After creating the tree, you can customize how it appears and behaves.

Configuring Tree Attributes

  1. Open Page Designer and select the Tree Region in the Rendering Pane.

  2. Modify the following attributes under the Tree Attributes section:

    • Icon Column: Specify an icon for nodes (e.g., fa-folder for parent nodes).

    • Expand All: Enable this if you want the tree fully expanded by default.

    • Lazy Loading: Set this to Yes if working with large datasets to improve performance.

Selection Type: Choose Single Selection if you want users to select only one node.

In conclusion, customizing the Tree Report empowers you to present complex hierarchical data in a clear and user-friendly way within Oracle APEX. With careful configuration and styling, your tree structures can better reflect business requirements and offer users a seamless navigation experience. Taking advantage of these customization options ensures your applications are both functional and visually engaging.

How do I Create a Table for Tree Data

 Creating a table to store tree data is an essential step when working with hierarchical structures in Oracle APEX. A well-designed table allows you to efficiently manage parent-child relationships and enables features like tree reports or navigation menus. Typically, such a table includes columns for a unique identifier, a reference to the parent record, and the display label or description. This setup helps represent the hierarchy clearly and supports easy querying and manipulation of the tree data within your APEX applications.

Before creating the report, ensure that your table follows a hierarchical structure. The table should have at least two key columns:

  1. ID – The unique identifier for each node.

  2. PARENT_ID – The reference to the parent node.

Example table structure:

CREATE TABLE DEPARTMENT_HIERARCHY (

    DEPT_ID      NUMBER PRIMARY KEY,

    DEPT_NAME    VARCHAR2(100),

    PARENT_ID    NUMBER REFERENCES DEPARTMENT_HIERARCHY(DEPT_ID)

);

Sample data:

INSERT INTO DEPARTMENT_HIERARCHY VALUES (1, 'Corporate', NULL);

INSERT INTO DEPARTMENT_HIERARCHY VALUES (2, 'Finance', 1);

INSERT INTO DEPARTMENT_HIERARCHY VALUES (3, 'HR', 1);

INSERT INTO DEPARTMENT_HIERARCHY VALUES (4, 'Payroll', 2);

INSERT INTO DEPARTMENT_HIERARCHY VALUES (5, 'Recruitment', 3);

COMMIT;


Creating a Tree Report in Oracle APEX

  1. Go to Oracle APEX and navigate to your application.

  2. Click CreatePageReportTree.

  3. Select Use a SQL Query as the data source.

  4. Enter the SQL Query for the tree structure:

SELECT 

    DEPT_ID AS ID,

    PARENT_ID AS PARENT_ID,

    DEPT_NAME AS NAME

FROM DEPARTMENT_HIERARCHY

Click Next, configure the report settings, and click Create.

In conclusion, designing a proper table structure for tree data lays the foundation for effective hierarchical data management in Oracle APEX. By including key columns such as node IDs and parent references, you ensure that your application can easily build, display, and maintain tree-like structures. This approach not only simplifies data handling but also enhances the user experience by enabling interactive and meaningful tree reports.

How do I Create a Tree Report in Oracle APEX

 Creating a Tree Report in Oracle APEX allows developers to display hierarchical data in a clear and interactive format. Tree Reports are ideal for representing parent-child relationships such as organizational structures, categories, or file systems. With APEX’s built-in tree region type, you can easily visualize complex data structures, enabling users to expand and collapse nodes to explore details dynamically.

Creating a Tree Report in Oracle APEX involves displaying hierarchical data in a tree structure that allows users to expand and collapse nodes to explore relationships between parent and child elements. This type of report is useful for visualizing data such as organizational charts, product categories, or file directories.

To create a Tree Report, start by navigating to the APEX application builder and open the page where you want to add the tree region. Choose to add a new region and select the "Tree" region type. In the region’s source, you will define a SQL query that returns the hierarchical data. The query must include columns for the node ID, parent node ID, and the display label.

For example, consider a simple employee hierarchy:

SELECT EMPLOYEE_ID AS ID,
       MANAGER_ID AS PARENT_ID,
       FULL_NAME AS DISPLAY_LABEL
FROM EMPLOYEES
ORDER BY FULL_NAME

Here, EMPLOYEE_ID uniquely identifies each node, MANAGER_ID links the employee to their manager (the parent node), and FULL_NAME is the text shown for each node in the tree.

After setting the source, configure the tree attributes. You can specify the node icon, tooltip, and which nodes are expanded by default. You can also enable node selection or navigation by setting a target page for when users click on a node.

Once saved, run the page to see the interactive tree report. Users can expand or collapse nodes to explore the hierarchy. The tree dynamically fetches data based on the parent-child relationships defined in the SQL query, making it efficient for large datasets.

Advanced customizations include adding conditional formatting, integrating dynamic actions to respond to node clicks, or combining the tree with other components for a richer user experience.

Creating a Tree Report in Oracle APEX allows you to present complex hierarchical data intuitively and interactively, improving usability and data exploration in your applications.

A Tree Report in Oracle APEX provides a structured way to display hierarchical data, such as organizational charts, category structures, or folder directories. This tutorial explains how to create, configure, and customize a Tree Report in APEX.


Understanding Tree Reports

A Tree Report is used to display parent-child relationships in a hierarchical format. It consists of:

  • Node (Parent Item): The main category or entity in the hierarchy.

  • Child Nodes (Sub-items): The subcategories or records linked to the parent.

  • Tree Structure: Expanding and collapsing nodes dynamically.

Tree Reports are best used when data follows a hierarchical structure, such as departments and employees, product categories and subcategories, or folders and files.

Mastering how to create Tree Reports in Oracle APEX helps you provide intuitive navigation and improve user experience when working with nested data. By leveraging SQL queries to define hierarchical relationships and configuring tree attributes, you can build responsive and visually appealing tree structures tailored to your application’s needs. This skill is essential for developing sophisticated data presentations in Oracle APEX.

HOW DO I SET A HOME PAGE

 Setting a home page in Oracle APEX is an essential step in defining the default landing page for your application. The home page serves as ...