Search This Blog

Tuesday, July 1, 2025

Using APEX Template Application with Parameters, Directives, and Functions

 Using the APEX Template Application with parameters, directives, and functions allows developers to create highly dynamic and reusable templates in Oracle APEX. These features enable customization of the look and feel of reports, forms, and other UI components by inserting variable content, controlling conditional logic, and looping through data. By leveraging parameters, directives, and functions within templates, developers can build flexible applications that adapt to different contexts and data scenarios, improving both efficiency and user experience.

Using APEX Template Application with parameters, directives, and functions is a powerful way to build flexible, reusable, and dynamic templates in Oracle APEX. These features enable you to customize the rendering of reports, forms, cards, and other UI components by injecting dynamic content, controlling flow logic, and iterating through collections of data within templates.

Parameters are placeholders inside a template that you define and then substitute with actual values at runtime. For example, you might create a parameter like {P1_NAME} to represent a user name or a database column value. When the page renders, APEX replaces this placeholder with the corresponding value. This allows the same template to be reused across different pages or reports, with the content dynamically tailored to the context.

Directives control the logic flow inside templates. The most common directives include conditional directives such as {if}, {elsif}, {else}, and {endif}. These let you define conditional blocks so certain content only appears when specific criteria are met. For example, you can show a special badge or highlight a field only when its value meets a condition. This conditional rendering enhances user experience by making the UI more responsive to data context.

Another set of directives are loop directives like {for} and {endfor}, which allow you to iterate over a list or collection of data inside the template. This is particularly useful when you want to display repeating elements, such as a list of items or rows within a card layout. Loop directives automate the repetition of HTML or other template markup for each item in the data set, eliminating the need for manual repetition.

Functions in APEX templates allow you to perform inline operations or transformations on data before rendering. For example, you might use functions to format dates, truncate text, or convert values to uppercase within the template itself. This lets you keep formatting logic close to the display code rather than spreading it throughout your PL/SQL or SQL queries.

To use these features effectively:

  1. Define Template Parameters: In the template definition, use curly braces {} to create named placeholders. For example, {ITEM_NAME} or {COLUMN_VALUE}.

  2. Implement Conditional Directives: Use {if condition}, {elsif condition}, {else}, and {endif} to control what parts of the template render based on dynamic conditions. The conditions typically reference parameters or data values.

  3. Use Loop Directives: Structure your template to repeat content by enclosing the repeatable section within {for item in collection} and {endfor}. Inside the loop, use {item.property} to refer to the current element’s properties.

  4. Apply Functions: Invoke built-in or custom functions within the template to transform parameters. For example, {UPPERCASE{PARAMETER}} could display the parameter value in uppercase.

  5. Test and Debug: Use the Template Options and Preview features in APEX to test how parameters and directives behave. Adjust your template logic to handle different data scenarios gracefully.

By combining parameters, directives, and functions, you can create highly adaptable templates that reduce duplication, improve maintainability, and provide a richer user interface. This method also aligns well with the modular design principles in Oracle APEX development, enabling you to build consistent, reusable UI components that respond intelligently to the application data.

Mastering APEX Template Application with these features significantly enhances your ability to deliver dynamic, data-driven user experiences with minimal coding effort.

1. applyTemplate Function

Purpose:
The applyTemplate function allows you to process a template string with placeholders and directives, substituting them with values or expressions.

Example:

You can create a template where placeholders like &P1_PROFILE_IMAGE_FILE are dynamically replaced with actual data from the page items or objects.

var options = { placeholders: { MESSAGE: "All is well." } };


apex.jQuery("#notification").html(

    apex.util.applyTemplate("<div>#MESSAGE#</div>", options)

);

This will render the message "All is well." inside a <div> element with the id #notification.

Use case:

  • Dynamically updating parts of the page (like messages or images) based on page items or variables.

2. arrayEqual Function

Purpose:
Compares two arrays and returns true if the arrays have the same number of elements and each element is strictly equal.

Example:

var result1 = apex.util.arrayEqual([1, "two", 3], [1, "two", 3]); // true

var result2 = apex.util.arrayEqual([1, "two", 3], [1, "two", "3"]); // false

Use case:

  • Compare arrays to check if the data has not changed.

  • Useful when validating if two arrays in a form are equal.

3. debounce Function

Purpose:
Returns a debounced version of a function. It delays execution of the function until after a certain amount of time has passed since the last call.

Example:

function formatValue() {

    var value = $v("P1_PHONE_NUMBER");

    $s("P1_PHONE_NUMBER_DISPLAY", value);

}


apex.jQuery("#P1_PHONE_NUMBER").on("keypress", apex.util.debounce(formatValue, 100));

Here, formatValue is called only after the user has stopped typing for 100 milliseconds, which reduces unnecessary function calls.

Use case:

  • To optimize handling of user input events like typing in form fields.

  • Avoid unnecessary server calls or updates when typing.

4. escapeCSS Function

Purpose:
Escapes CSS meta-characters in a string, ensuring that it can be safely used as part of a CSS selector.

Example:

apex.jQuery("#" + apex.util.escapeCSS("my.id"));

Use case:

  • Dynamically generating CSS selectors when element IDs or class names may contain special characters like periods (.), which could interfere with CSS selectors.

5. escapeHTML Function

Purpose:
Escapes special HTML characters to prevent XSS (Cross-Site Scripting) attacks when inserting untrusted data into the DOM.

Example:

apex.jQuery("#show_user").append(apex.util.escapeHTML($v("P1_UNTRUSTED_NAME")));

Use case:

  • When inserting user-generated content or external data into HTML, always escape it to prevent potential security vulnerabilities.

6. escapeHTMLAttr Function

Purpose:
Escapes special HTML characters in attribute values to avoid XSS attacks.

Example:

apex.jQuery("#show_user").attr("title", apex.util.escapeHTMLAttr($v("P1_UNTRUSTED_NAME")));

Use case:

  • Safely injecting user data into HTML attributes like title, alt, etc., to prevent XSS vulnerabilities.

7. getDateFromISO8601String Function

Purpose:
Converts an ISO 8601 date string into a JavaScript Date object.

Example:

var date1 = apex.util.getDateFromISO8601String("1987-01-23T13:05:09.040Z");

Use case:

  • Convert ISO 8601 date strings into JavaScript Date objects for manipulation or formatting.

  • Useful for dealing with date strings returned from APIs or databases.

8. getNestedObject Function

Purpose:
Returns a nested object at a specific path within a complex object structure.

Example:

var options = {

    views: {

        grid: {

            features: {

                cellRangeActions: true

            }

        }

    }

};


var o = apex.util.getNestedObject(options, "views.grid.features");

o.cellRangeActions = false; // now options.views.grid.features.cellRangeActions === false

Use case:

  • Used when you need to manipulate deeply nested properties within an object, ensuring that missing properties are created dynamically.

9. getScrollbarSize Function

Purpose:
Returns the size of the system scrollbar (if present).

Example:

var size = apex.util.getScrollbarSize();

console.log(size); // { width: 17, height: 17 }

Use case:

  • Helps in layout adjustments when adding or removing scrollbars dynamically.

10. htmlBuilder Function

Purpose:
Returns an htmlBuilder interface, which allows you to build HTML dynamically.

Example:

var builder = apex.util.htmlBuilder();

builder.div().content("Hello World").end();

var html = builder.toString();

apex.jQuery("#container").html(html);

Use case:

  • Dynamically constructing HTML elements in a more programmatic and reusable manner.

11. invokeAfterPaint and cancelInvokeAfterPaint Functions

Purpose:

  • invokeAfterPaint: Executes a function before the next browser paint (reflow/repaint).

  • cancelInvokeAfterPaint: Cancels the previously scheduled function call.

Example:

var id = apex.util.invokeAfterPaint(function() {

    console.log("This will be executed before the next repaint.");

});


// Optionally cancel the execution before the paint happens

apex.util.cancelInvokeAfterPaint(id);

Use case:

  • Perform tasks like animations or layout adjustments before the page is visually updated.

12. showSpinner Function

Purpose:
Displays a loading spinner on the page, indicating that some processing is taking place.

Example:

var lSpinner$ = apex.util.showSpinner($("#container_id"));

lSpinner$.remove(); // Removes the spinner once processing is complete.

Use case:

  • Display a spinner while processing a form or making an AJAX request to give users feedback that something is happening in the background.

13. stripHTML Function

Purpose:
Removes all HTML tags from a string.

Example:

var text = "Please <a href='www.example.com/ad'>click here</a>";

var strippedText = apex.util.stripHTML(text);

console.log(strippedText); // "Please click here"

Use case:

  • Strip unwanted HTML tags from user input or data that will be displayed as plain text.

14. toArray Function

Purpose:
Converts a value into an array. If the value is a string, it splits it based on a separator. If it's already an array or jQuery object, it converts it into a true JavaScript array.

Example:

var products = apex.util.toArray("Bags:Shoes:Shirts", ":");

console.log(products); // ["Bags", "Shoes", "Shirts"]

Use case:

  • Convert values into arrays for easier processing, such as when working with lists of items or elements on the page.


EXAMPLE:

Table – Table name: Requests
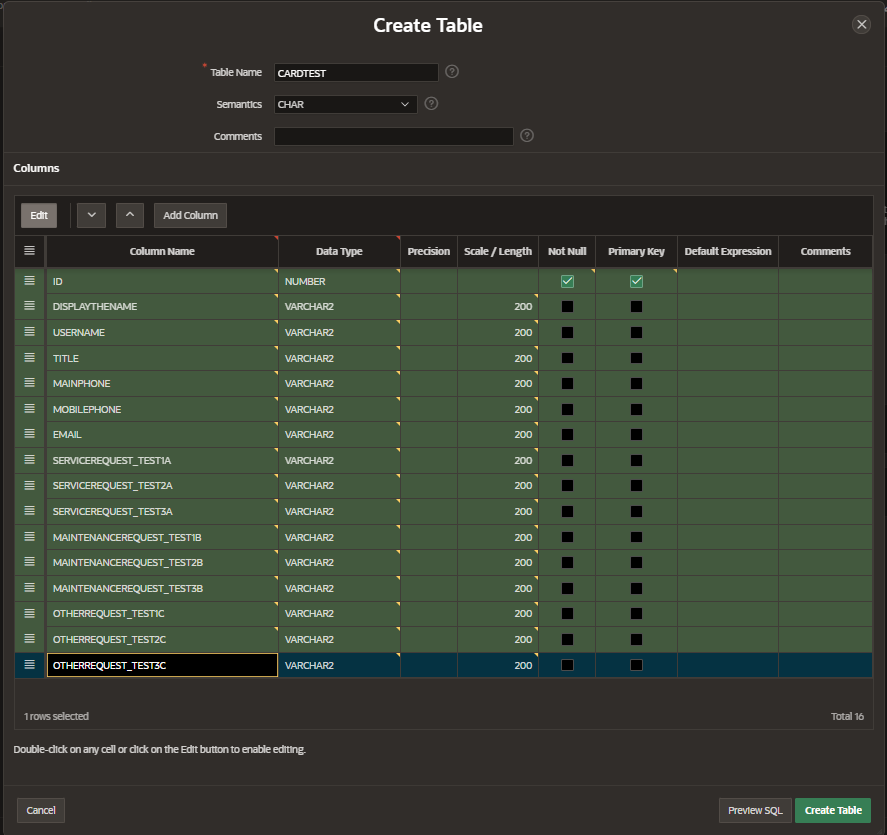
Column Name

Value Type

ID

Number

DisplayName

Varchar2

UserDisplayName

Varchar2

Title

Varchar2

MainPhone

Varchar2

MobilePhone

Varchar2

Email

Varchar2

ServiceRequest_Test1A

Varchar2

ServiceRequest_Test2A

Varchar2

ServiceRequest_Test3A

Varchar2

MaintenanceRequest_Test1B

Varchar2

MaintenanceRequest_Test2B

Varchar2

MaintenanceRequest_Test3B

Varchar2

OtherRequest_Test1C

Varchar2

OtherRequest_Test2C

Varchar2

OtherRequest_Test3C

Varchar2


A screenshot of a computer

AI-generated content may be incorrect.

Code:

  CREATE TABLE "CARDTEST" 

   ( "ID" NUMBER GENERATED BY DEFAULT ON NULL AS IDENTITY MINVALUE 1 MAXVALUE 9999999999999999999999999999 INCREMENT BY 1 START WITH 1 CACHE 20 NOORDER  NOCYCLE  NOKEEP  NOSCALE  NOT NULL ENABLE, 

"DISPLAYTHENAME" VARCHAR2(200 CHAR), 

"USERNAME" VARCHAR2(200 CHAR), 

"TITLE" VARCHAR2(200 CHAR), 

"MAINPHONE" VARCHAR2(200 CHAR), 

"MOBILEPHONE" VARCHAR2(200 CHAR), 

"EMAIL" VARCHAR2(200 CHAR), 

"SERVICEREQUEST_TEST1A" VARCHAR2(200 CHAR), 

"SERVICEREQUEST_TEST2A" VARCHAR2(200 CHAR), 

"SERVICEREQUEST_TEST3A" VARCHAR2(200 CHAR), 

"MAINTENANCEREQUEST_TEST1B" VARCHAR2(200 CHAR), 

"MAINTENANCEREQUEST_TEST2B" VARCHAR2(200 CHAR), 

"MAINTENANCEREQUEST_TEST3B" VARCHAR2(200 CHAR), 

"OTHERREQUEST_TEST1C" VARCHAR2(200 CHAR), 

"OTHERREQUEST_TEST2C" VARCHAR2(200 CHAR), 

"OTHERREQUEST_TEST3C" VARCHAR2(200 CHAR), 

CONSTRAINT "CARDTEST_PK" PRIMARY KEY ("ID")

  USING INDEX  ENABLE

   ) ;


Add the Data

A screenshot of a computer

AI-generated content may be incorrect.


ID

DISPLAYTHENAME

USERNAME

TITLE

MAINPHONE

MOBILEPHONE

EMAIL

SERVICEREQUEST_TEST1A

SERVICEREQUEST_TEST2A

SERVICEREQUEST_TEST3A

MAINTENANCEREQUEST_TEST1B

MAINTENANCEREQUEST_TEST2B

MAINTENANCEREQUEST_TEST3B

OTHERREQUEST_TEST1C

OTHERREQUEST_TEST2C

OTHERREQUEST_TEST3C

1

Y

Chuck, Doe

Manager

555-555-1212

555-555-7272

Chuck.Doe@someemail.com

Y

N

N

Y

Y

N

Y

N

Y

2

N


Y

N

Y

Y

Y

Y

N

Y

N


Column Name

Value Type

Row 1 Data

Row 2 Data

ID

Number

1

2

DisplayTheName

Varchar2

Y

N

UserName

Varchar2

Chuck Doe

null

Title

Varchar2

MANAGER

null

MainPhone

Varchar2

555-555-1212

null

MobilePhone

Varchar2

555-555-7272

null

Email

Varchar2

Chuck.Doe@someemail.com

null

ServiceRequest_Test1A

Varchar2

Y

Y

ServiceRequest_Test2A

Varchar2

N

N

ServiceRequest_Test3A

Varchar2

N

Y

MaintenanceRequest_Test1B

Varchar2

Y

Y

MaintenanceRequest_Test2B

Varchar2

Y

Y

MaintenanceRequest_Test3B

Varchar2

N

Y

OtherRequest_Test1C

Varchar2

Y

N

OtherRequest_Test2C

Varchar2

N

Y

OtherRequest_Test3C

Varchar2

Y

N


We’ll be looking to display to cards (one for each data row)

Report Card-1 (row 1 data)


Display Name

Job Title

Business Phone

Mobile Phone

Email

Doe, Chuck

MANAGER

555-555-1212

555-555-7272

Chuck.Doe@someemail.com


Service Request

Maintenance Request

Other

TEST1A:   Y

TEST1B:   Y

TEST1C:    Y

TEST2A:   N

TEST2B:   N

TEST2C:    N

TEST3A:   N

TEST3B:   N

TEST3C:    N


Report Card-2 (row 2 data)


Service Request

Maintenance Request

Other

TEST1A:   Y

TEST1B:   Y

TEST1C:    N

TEST2A:   N

TEST2B:   Y

TEST2C:    Y

TEST3A:   Y

TEST3B:   N

TEST3C:    N


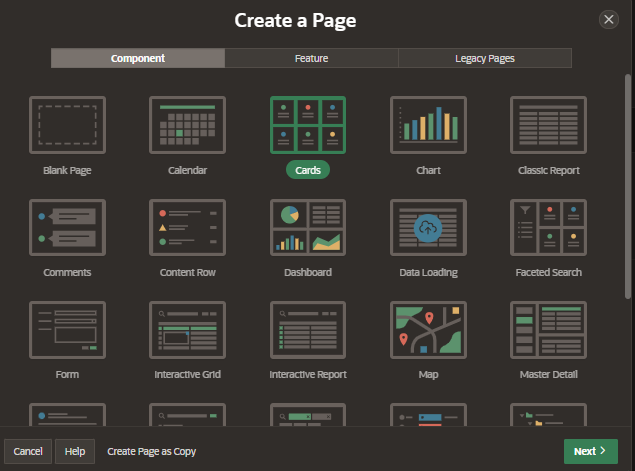
Create a “CARDS” Page

Step 1

A screenshot of a computer

AI-generated content may be incorrect.


A screenshot of a computer

AI-generated content may be incorrect.


A screenshot of a computer

AI-generated content may be incorrect.


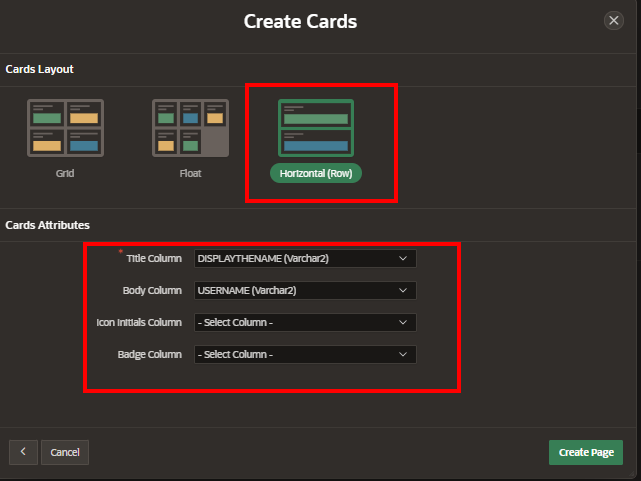
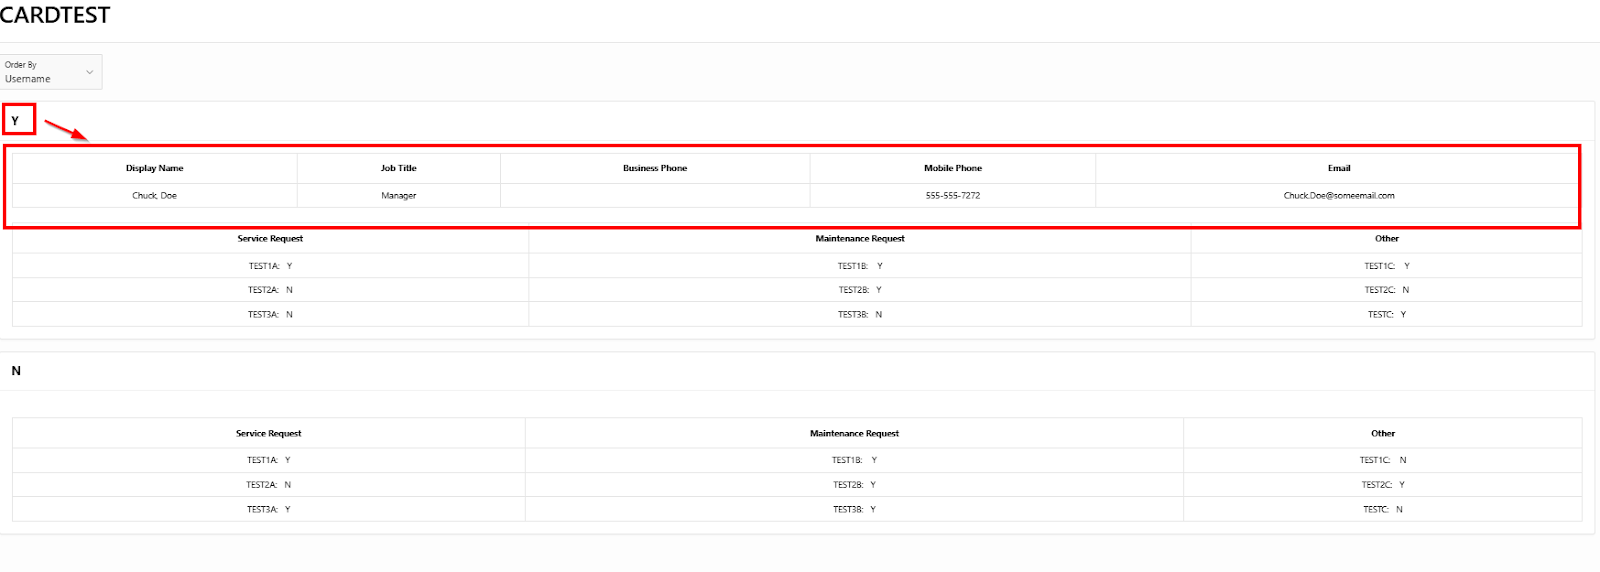
Display of the web page with two cards, one for each data row.

A screenshot of a phone

AI-generated content may be incorrect.

We want to make the data display something like this:


Display Name

Job Title

Business Phone

Mobile Phone

Email

Doe, Chuck

MANAGER

555-555-1212

555-555-7272

Chuck.Doe@someemail.com


Service Request

Maintenance Request

Other

TEST1A:   Y

TEST1B:   Y

TEST1C:    Y

TEST2A:   N

TEST2B:   N

TEST2C:    N

TEST3A:   N

TEST3B:   N

TEST3C:    N


Lets set up the name header area:

A close-up of a phone number

AI-generated content may be incorrect.

Notes:

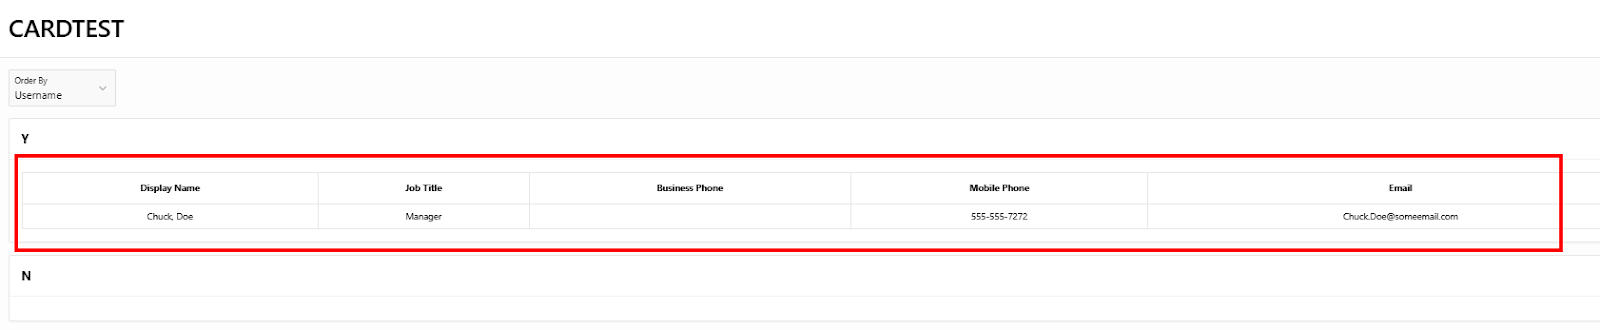
  • We want this area to display ONLY when DisplayTheName =Y

  • Any othe value will display a blank area.

  • Place this code in a Notepad for easier use and edit

To implement this logic we have to use the following:

#{if <condition>} 

    <content>

#{else} 

    <alternative_content>

#{/if}


In the code we will enter the following:

<div class="t-Report t-Report--stretch "  style="width:100%">


{case DisplayTheName /}

{when Y/}

<!--- Code for the table goes here when the value is “Y” -->

{when N/}

<!--- Code for the table goes here when the value is “N” -->

{otherwise/}

<!--- Code for the table goes here when the value is neither “Y”  or “N”-->

{endcase/}


</div>


Then we will add the HTML code for the table where the value is “Y”:

<table class="t-Report-report  u-textCenter">

<thead class="t-Report-report u-textCenter">


<tr>

    <th class="t-Report-colHead u-bold  ">Display Name</th>

    <th class="t-Report-colHead u-bold  ">Job Title </th>

    <th class="t-Report-colHead u-bold  ">Business Phone </th>

    <th class="t-Report-colHead u-bold  ">Mobile Phone </th>

    <th class="t-Report-colHead u-bold  ">Email </th>

</tr>

</thead>

<tbody>

<tr>

      <td class="t-Report-cell">  &USERNAME.  </td>

    <td class="t-Report-cell"> &TITLE.  </td>

    <td class="t-Report-cell">  &PRIMARYPHONE. </td>

    <td class="t-Report-cell">  &MOBILEPHONE.  </td>

    <td class="t-Report-cell">  &EMAIL. </td>

</tr>


</tbody>

</table>


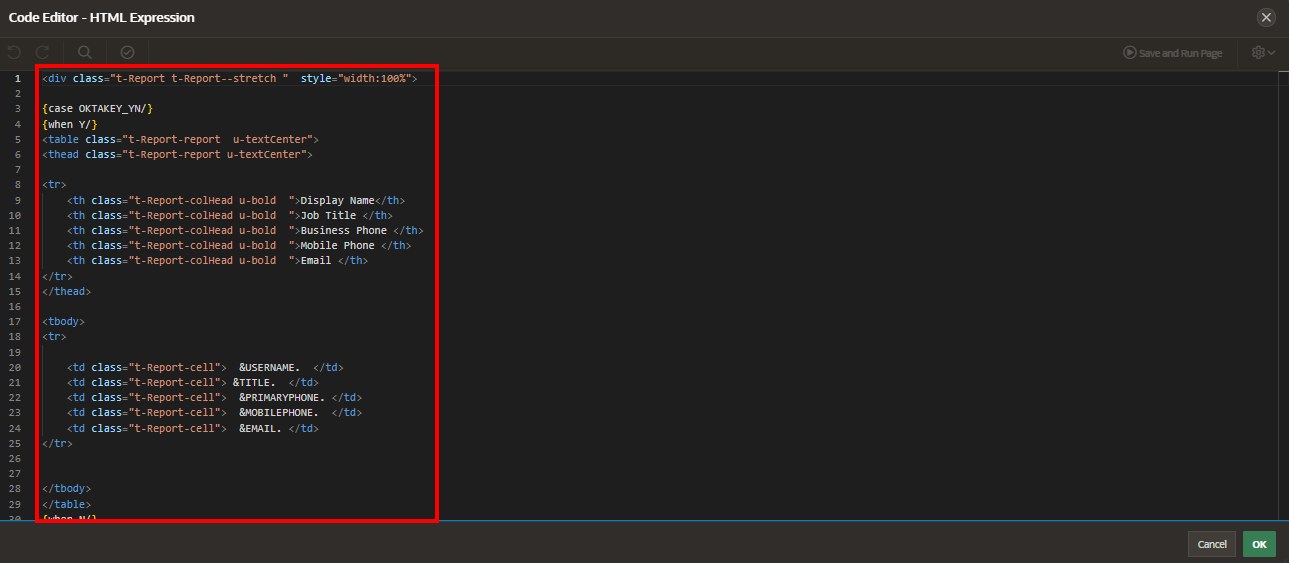
Here is the code inserted into the “IF” loop

<div class="t-Report t-Report--stretch "  style="width:100%">


{case DisplayTheName /}

{when Y/}

<!--- Code for the table goes here when the value is “Y” -->

<table class="t-Report-report  u-textCenter">

<thead class="t-Report-report u-textCenter">


<tr>

    <th class="t-Report-colHead u-bold  ">Display Name</th>

    <th class="t-Report-colHead u-bold  ">Job Title </th>

    <th class="t-Report-colHead u-bold  ">Business Phone </th>

    <th class="t-Report-colHead u-bold  ">Mobile Phone </th>

    <th class="t-Report-colHead u-bold  ">Email </th>

</tr>

</thead>

<tbody>

<tr>

      <td class="t-Report-cell">  &USERNAME.  </td>

    <td class="t-Report-cell"> &TITLE.  </td>

    <td class="t-Report-cell">  &PRIMARYPHONE. </td>

    <td class="t-Report-cell">  &MOBILEPHONE.  </td>

    <td class="t-Report-cell">  &EMAIL. </td>

</tr>


</tbody>

</table>


{when N/}

<!--- Code for the table goes here when the value is “N” -->

{otherwise/}

<!--- Code for the table goes here when the value is neither “Y”  or “N”-->

{endcase/}


</div>


Now, where go to the page in order to add the new code.

Select the Report in the page

A screenshot of a computer

AI-generated content may be incorrect.


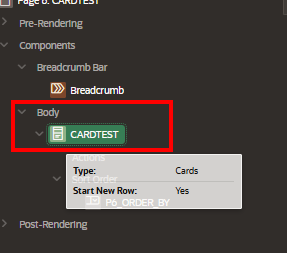
Select the attribute:

A black rectangular object with a black border

AI-generated content may be incorrect.


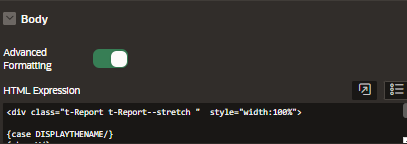
Navigate to the “Body” region on the right hand side, below the “Attributes” section and turn on the “Advanced Formating”

A black rectangular object with red lines

AI-generated content may be incorrect.


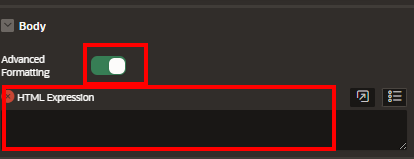
Select the Arrow button

A black rectangular object with a black stripe

AI-generated content may be incorrect.

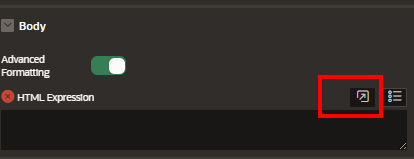
Add the code in the window:

A screenshot of a computer

AI-generated content may be incorrect.

Your page should now look something like this:

A screen shot of a computer

AI-generated content may be incorrect.


If you run the page you will see that nothing has changed:

A white background with black lines

AI-generated content may be incorrect.

So what went wrong?

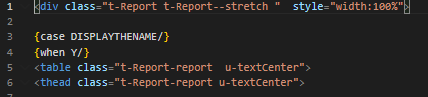
We need to make the search criteria upper case, so we will change the code 

  • from {case DisplayTheName /}

  • to {case DISPLAYTHENAME /}

A screen shot of a computer

AI-generated content may be incorrect.

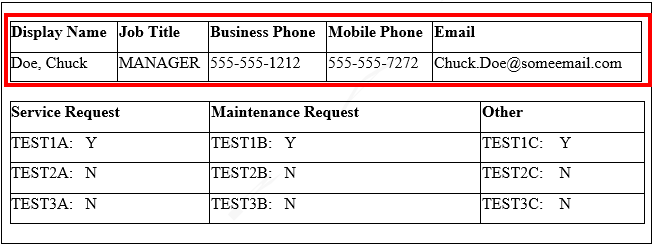
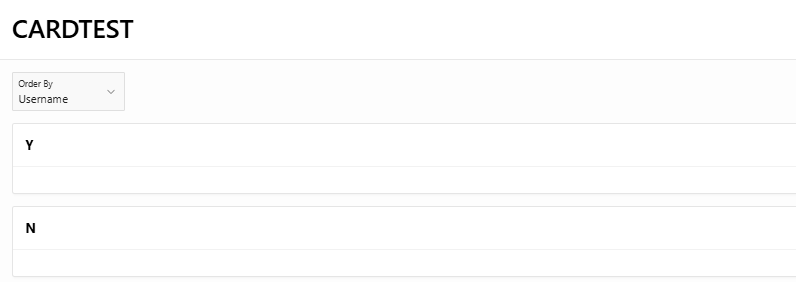
Now save and run the page and we get the following result:

A screenshot of a computer

AI-generated content may be incorrect.


Next, we will add the rest of the HTML code, making sure that all of the replacement variables

  • Have a “&” at the start of the variable name.

  • Are in upper case.

  • Have a “.” Period at the end of the name.

  • They should look something like this “&XXXXXXXXXXX.”
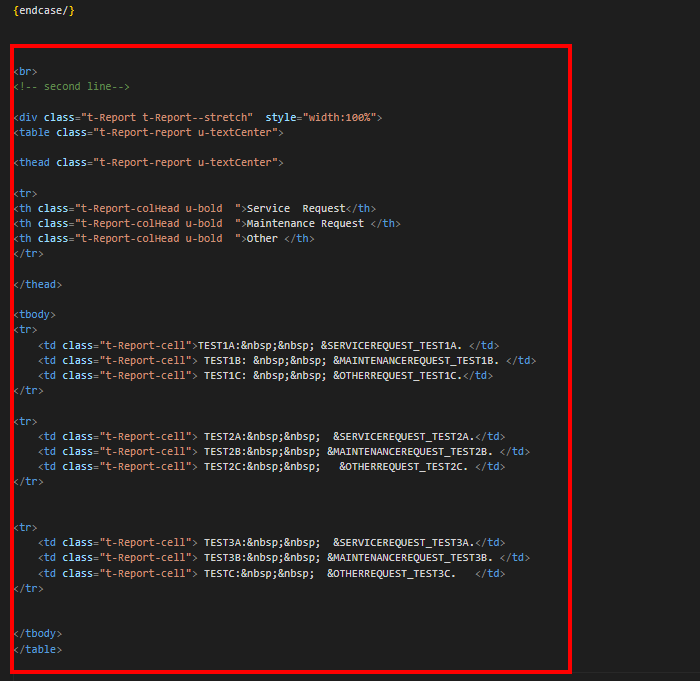
<br>

<!-- second line-->

<div class="t-Report t-Report--stretch"  style="width:100%">

<table class="t-Report-report u-textCenter">

<thead class="t-Report-report u-textCenter">

<tr>

<th class="t-Report-colHead u-bold  ">Service  Request</th>

<th class="t-Report-colHead u-bold  ">Maintenance Request </th>

<th class="t-Report-colHead u-bold  ">Other </th>

</tr>

</thead>

<tbody>

<tr>

    <td class="t-Report-cell"> Test1A:&nbsp;&nbsp; &SERVICEREQUEST_TEST1A. </td>

    <td class="t-Report-cell"> Test1B: &nbsp;&nbsp; &MAINTENANCEREQUEST_TEST1B. </td>

    <td class="t-Report-cell"> Test1C: &nbsp;&nbsp; &OTHERREQUEST_TEST1C.</td>

</tr>

<tr>

    <td class="t-Report-cell"> Test2A:&nbsp;&nbsp;  & SERVICEREQUEST_TEST 2A.</td>

    <td class="t-Report-cell"> Test2B:&nbsp;&nbsp;  & MAINTENANCEREQUEST_TEST2B. </td>

    <td class="t-Report-cell"> Test2C:&nbsp;&nbsp;   & OTHERREQUEST_TEST 2C. </td>

</tr>


<tr>

    <td class="t-Report-cell"> Test3A:&nbsp;&nbsp;  & SERVICEREQUEST_TEST 3A.</td>

    <td class="t-Report-cell"> Test3B: & MAINTENANCEREQUEST_TEST3B. </td>

    <td class="t-Report-cell"> Test3C:&nbsp;&nbsp;  & OTHERREQUEST_TEST 3C.   </td>

</tr>

</tbody>

</table>

</div>

Make sure that you add the code outside of the “IF” loop

A screen shot of a computer

AI-generated content may be incorrect.


<br>

<!-- second line-->


<div class="t-Report t-Report--stretch"  style="width:100%">

<table class="t-Report-report u-textCenter">


<thead class="t-Report-report u-textCenter">


<tr>

<th class="t-Report-colHead u-bold  ">Service  Request</th>

<th class="t-Report-colHead u-bold  ">Maintenance Request </th>

<th class="t-Report-colHead u-bold  ">Other </th>

</tr>

</thead>

<tbody>

<tr>

    <td class="t-Report-cell">TEST1A:&nbsp;&nbsp; &SERVICEREQUEST_TEST1A. </td>

    <td class="t-Report-cell"> TEST1B: &nbsp;&nbsp; &MAINTENANCEREQUEST_TEST1B. </td>

    <td class="t-Report-cell"> TEST1C: &nbsp;&nbsp; &OTHERREQUEST_TEST1C.</td>

</tr>

<tr>

    <td class="t-Report-cell"> TEST2A:&nbsp;&nbsp;  &SERVICEREQUEST_TEST2A.</td>

    <td class="t-Report-cell"> TEST2B:&nbsp;&nbsp; &MAINTENANCEREQUEST_TEST2B. </td>

    <td class="t-Report-cell"> TEST2C:&nbsp;&nbsp;   &OTHERREQUEST_TEST2C. </td>

</tr>

<tr>

    <td class="t-Report-cell"> TEST3A:&nbsp;&nbsp;  &SERVICEREQUEST_TEST3A.</td>

    <td class="t-Report-cell"> TEST3B:&nbsp;&nbsp; &MAINTENANCEREQUEST_TEST3B. </td>

    <td class="t-Report-cell"> TESTC:&nbsp;&nbsp;  &OTHERREQUEST_TEST3C.   </td>

</tr>

</tbody>

</table>


A screenshot of a computer program

AI-generated content may be incorrect.


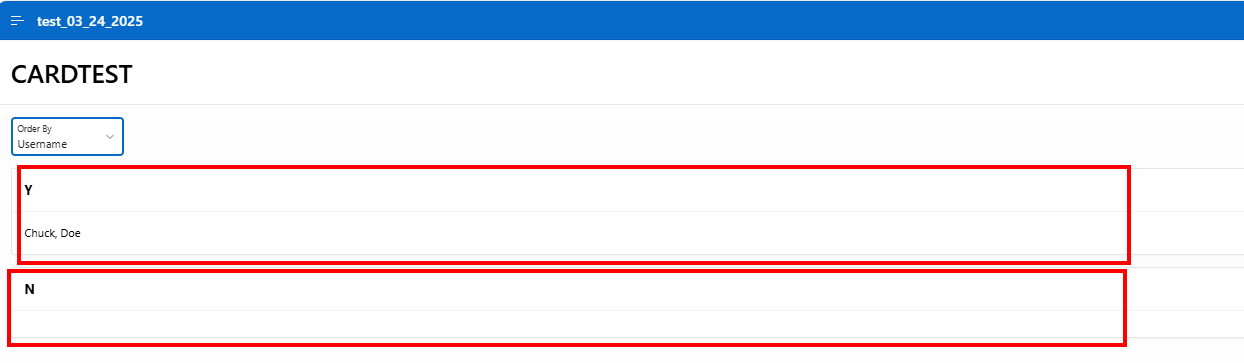
Here are the results:

When the “DISPLAYTHENAME” value is “Y” we display the header, otherwise nothing displays.

A screenshot of a computer

AI-generated content may be incorrect.

Mastering the use of APEX Template Application with parameters, directives, and functions is a powerful way to enhance the customization and scalability of your Oracle APEX applications. These tools help reduce repetitive coding by enabling reusable template components that dynamically adjust content and behavior. Incorporating these techniques leads to cleaner, more maintainable code and delivers richer, more interactive user interfaces.

How to Escape an Open Bracket in Oracle APEX Templates

 In Oracle APEX templates, special characters like the open bracket { have specific functions as part of substitution and directive syntax. However, there are times when you need to display an actual open bracket character in your template output rather than trigger APEX’s template processing. Escaping the open bracket correctly ensures that your content renders as intended without being interpreted as part of the template language. This blog will guide you through the proper methods to escape open brackets within Oracle APEX templates, helping you maintain accurate display and avoid syntax errors.

When working with templates, it is possible to encounter a situation where the open bracket { can be confused for the start of a directive (e.g., {if} or {loop}). This issue arises when the open bracket appears in the middle of the code, followed by a directive, causing a potential conflict. To avoid this confusion, you can escape the open bracket using the syntax {{/}.

In this tutorial, we will walk you through how and when to use the escape sequence {{/} in APEX templates, and provide examples to demonstrate its usage.

1. Why Do You Need to Escape the Open Bracket {?

The APEX templating engine uses brackets { and } to define directives, such as {if}, {loop}, {case}, etc. In some cases, when an open bracket is placed before these directives on the same line, it might be misinterpreted as the start of a directive, causing a parsing error.

Escape Sequence:

  • {{/}: The escape sequence to use when you need to display an open bracket { in the template text without it being interpreted as the start of a directive.

2. When Do You Need to Escape the Open Bracket {?

You need to escape the { when it appears before a directive in a line, causing the template engine to interpret it as part of a directive. For example:

{if VAL/}&VAL.{else/}unknown{endif/}

In the above case, if you want to include { literally (e.g., in a mathematical expression), the APEX engine will interpret it as the start of a directive. To avoid this, use the escape sequence {{/} to display the { symbol literally.

3. Example 1: Escaping the Open Bracket in a Mathematical Expression

Scenario:

You want to display coordinates such as {c, d}, but without the template engine interpreting { as the start of a directive.

Without escaping:

<span>The coordinates {c, d} = {if VAL/}&VAL.{else/}unknown{endif/}</span>

This could cause an error because the APEX engine might think {c, d} is part of a directive. To prevent this issue, you should escape the { by using the escape sequence {{/}.

Escaped version:

<span>The coordinates {{/}c, d} = {if VAL/}&VAL.{else/}unknown{endif/}</span>

Explanation:

  • {{/}c, d}: This ensures the { character is displayed literally and not treated as part of a directive.

  • The rest of the expression {if VAL/}&VAL.{else/}unknown{endif/} works as expected and shows either the value of VAL or unknown.

Expected Output:

If VAL is set to 10, the output will be:

The coordinates {c, d} = 10

If VAL is not set, it will display:

The coordinates {c, d} = unknown

4. Example 2: No Need to Escape Brackets in Simple Cases

In many cases, you won’t need to escape the open bracket {. If the { is simply part of your content and not followed by a directive on the same line, it will be treated as a regular character.

Scenario:

You want to display {c, d} in a regular expression or a descriptive sentence.

<span>The coordinates { c, d } = {if VAL/}&VAL.{else/}unknown{endif/}</span>

Explanation:

  • Here, the { c, d } part is simply text and doesn’t conflict with any directives.

  • The rest of the template will work as usual, displaying either the value of VAL or unknown.

Expected Output:

If VAL is set to 20, the output will be:

The coordinates { c, d } = 20

If VAL is not set, it will display:

The coordinates { c, d } = unknown

5. Example 3: Escaping Brackets When Using Directives

In some situations, the bracket { might appear in combination with a directive, and you need to escape it to prevent conflicts. Here's an example where you need to escape the open bracket before using an if directive.

Scenario:

You want to display an expression such as {c, d} = 10 only if a certain condition is true.

Without escaping:

<span>{c, d} = {if VAL/}&VAL.{else/}unknown{endif/}</span>

This could cause a parsing error, so you should use {{/} to escape the {.

Escaped version:

<span>{{/}c, d} = {if VAL/}&VAL.{else/}unknown{endif/}</span>

Expected Output:

If VAL is set to 10, the output will be:

{c, d} = 10

If VAL is not set, it will display:

{c, d} = unknown

6. Example 4: No Need to Escape Inside Block Directives

If you are using a block directive, such as {if} or {loop}, where the brackets {} appear inside the block, you don’t need to escape them. For instance:

{if VAL/}

    <span>The coordinates {c, d} = {VAL}</span>

{else/}

    <span>The coordinates {c, d} = unknown</span>

{endif/}

This will work perfectly fine because the {c, d} part is outside of the directive, and APEX doesn’t interpret the brackets as part of the directive.

7. Summary of When to Escape the Open Bracket

  • Escape Bracket: Use {{/} when you want to display { literally in a context where the APEX engine might interpret it as the start of a directive. This typically happens when an open bracket { is immediately followed by a directive, such as {if}, {loop}, or others.

  • No Escape Needed: You don't need to escape { when it’s simply part of the content (i.e., not immediately followed by a directive).

8. Best Practices

  • Be aware of directive boundaries: If you’re working with template expressions or custom formatting, always ensure that the { is not interpreted as part of a directive. If it’s in a context where it might be, use the escape sequence.

Use escaping sparingly: Only escape { when necessary. Overusing it can make your templates harder to read.

Mastering how to escape open brackets in Oracle APEX templates is essential for creating flexible and robust templates, especially when dealing with custom HTML or code snippets. By applying the correct escape sequences or alternative encoding techniques, you ensure that your templates show literal brackets exactly where needed, preserving the visual and functional integrity of your application. Proper escaping not only prevents processing conflicts but also enhances template maintainability and readability.

How to Use APEX Comments with Syntax {!/}

 In Oracle APEX, creating and managing templates often involves inserting special syntax that controls how data and elements are rendered dynamically. One helpful feature for organizing and documenting these templates is the use of APEX comment directives. By using the syntax {!<comment-text>/}, developers can insert inline comments that are only visible during development and are completely removed from the rendered HTML. These comments do not appear in the final output, making them ideal for leaving notes, version tags, or reminders within complex template structures without affecting performance or display.

In Oracle APEX, when customizing templates such as Classic Reports, Card Reports, or Interactive Report templates, developers often need to leave behind comments for documentation or clarification without affecting the final HTML output. Oracle APEX supports a special syntax for this purpose: the comment directive {!<comment-text>/}. This syntax allows you to insert comments directly inside the Template Text of a report or region. These comments are removed during rendering and are not visible to end users in the browser, unlike standard HTML comments (<!-- -->) which are still included in the page source.

To use APEX comment directives, you simply wrap your comment text within {! ... /}.

Example of Use:

<div class="card">
  <div class="card-header">
    {! This section displays the employee name /}
    #EMPLOYEE_NAME#
  </div>
  <div class="card-body">
    {! Department and salary details /}
    #DEPARTMENT# - #SALARY#
  </div>
</div>

In the example above, two APEX comment directives are included. These will be visible to the developer while editing the template but will not appear in the page’s source code or interfere with the layout.

Key Points:

  • Use this directive only in template definitions like region templates, column templates, and report templates.

  • These comments are evaluated server-side and stripped before HTML is generated.

  • They are ideal for annotating logic, explaining sections, or temporarily disabling template content during development.

  • Unlike HTML comments, APEX comments do not impact client-side performance since they are completely removed from the DOM.

By using {! ... /} for comments, you maintain clean and professional output while keeping your template logic well-documented and easier to manage over time.

Example

In Oracle APEX templates, comments are a powerful tool to help organize your code, provide explanations, or temporarily disable sections of your template without affecting the execution of your APEX application. The APEX comment syntax {!<comment-text>/} allows you to embed comments in your template code.

In this tutorial, we'll explore how to create and use comments in Oracle APEX templates using the {!<comment-text>/} syntax.

1. Basic Syntax of APEX Comments

The syntax for adding a comment in APEX is as follows:

{!<comment-text>/}

Where:

  • {!: Marks the beginning of the comment.

  • <comment-text>: The text inside the comment, which can be any descriptive content, explanation, or even temporarily disabled code.

  • /}: Marks the end of the comment.

The content inside {! and /} is not processed or displayed by APEX, making it useful for adding comments without affecting the rendering of the template.

2. Examples of Using APEX Comments

Example 1: Basic Comment

In a template, you can add a simple comment to explain a section of code:

{!This is a comment explaining the next section of the code/}

<h1>Welcome to My APEX Application</h1>

Explanation:

  • The comment will not appear in the browser output.

  • The <h1> tag and its content will still be rendered as normal on the page.

Output:

The output on the web page will just display:

<h1>Welcome to My APEX Application</h1>

Example 2: Commenting Out a Section of Code

You can use comments to temporarily disable a section of code without deleting it. For example:

{!<div class="old-feature">This section is no longer used.</div>/}

<h2>Current Feature Section</h2>

<p>New content goes here.</p>

Explanation:

  • The <div> element will not be rendered, effectively disabling the "old feature" section.

  • The <h2> and <p> tags will be rendered as normal.

Output:

<h2>Current Feature Section</h2>

<p>New content goes here.</p>

Example 3: Commenting a Complex Template with Multiple Sections

In a more complex APEX template, you can use comments to organize different sections of your code:

{!Header Section - This will be displayed at the top of the page/}

<header>

    <h1>Page Title</h1>

    <p>Subtitle or description</p>

</header>


{!Content Section - Main body content starts here/}

<div>

    <p>Here is the main content of the page.</p>

</div>


{!Footer Section - Footer will be displayed at the bottom/}

<footer>

    <p>Footer content goes here.</p>

</footer>

Explanation:

  • Each section is commented to indicate its purpose, making the code easier to read and maintain.

  • The browser will render all the HTML elements (header, content, and footer), but the comments are only for developers.

Output:

<header>

    <h1>Page Title</h1>

    <p>Subtitle or description</p>

</header>


<div>

    <p>Here is the main content of the page.</p>

</div>


<footer>

    <p>Footer content goes here.</p>

</footer>

The comments are not visible in the browser output, but they help developers understand the structure and purpose of each section.

3. Using Comments for Debugging and Development

Sometimes, during the development process, you might want to disable a specific part of the template for testing or debugging. Here's an example:

Example 4: Disabling Code Temporarily

{!<div class="debug-section">This section is temporarily disabled for debugging purposes.</div>/}

<p>Here is some visible content that will be displayed while the debugging section is disabled.</p>

Explanation:

  • The <div class="debug-section"> will not be rendered because it is commented out.

  • The <p> tag with content will be rendered as normal.

Output:

<p>Here is some visible content that will be displayed while the debugging section is disabled.</p>

4. Nested Comments (Not Supported)

It’s important to note that nested comments are not supported in APEX templates. That means you cannot have a comment inside another comment. For example:

{! This is a comment {! Nested comment here /}! /}

This will result in a syntax error and should be avoided. Always ensure your comments are properly closed before starting a new comment.

5. Benefits of Using APEX Comments

  • Documentation: Adding comments helps document your templates, making it easier for other developers to understand the code structure.

  • Disabling Code: You can use comments to temporarily disable parts of the template during development or testing, which can speed up troubleshooting.

  • Code Organization: Using comments to mark sections (e.g., header, content, footer) makes the code easier to navigate and maintain.

  • No Impact on Rendering: Comments are never rendered in the output, meaning they won’t affect the layout or performance of the application.

6. Best Practices for Using Comments

  • Be Clear and Concise: Keep comments simple and direct. Avoid over-commenting or adding unnecessary comments that do not add value.

  • Use Comments for Sections: Group related blocks of code with comments to make it easier to understand the purpose of different sections.

  • Avoid Commenting Out Large Code Blocks: Instead of commenting out large sections of code, consider using version control systems (e.g., Git) to track changes and roll back when necessary.

Using APEX comment syntax is a simple yet powerful way to keep your templates maintainable and easy to understand—especially when working in teams or revisiting projects later. Since these comments are stripped out at runtime, they won’t interfere with the page layout or add unnecessary weight to the output, ensuring that your applications remain clean and efficient while still being well-documented under the hood.

HOW DO I SET A HOME PAGE

 Setting a home page in Oracle APEX is an essential step in defining the default landing page for your application. The home page serves as ...