In Oracle APEX, obtaining the current user’s name within PL/SQL is essential for auditing, personalization, and security-related logic. You can use built-in substitution strings like :APP_USER, APEX utility functions such as v('APP_USER'), or the Oracle context function SYS_CONTEXT('USERENV','SESSION_USER') to retrieve the username. Embedding these expressions in PL/SQL processes, validations, or default value computations enables you to tailor page behavior and data operations based on who is logged in.
Use ARIAL font, size 14px, plain text:
To retrieve the currently logged‐in user’s name in Oracle APEX within a PL/SQL expression, you have several reliable options. The simplest is to use the built‑in substitution string :APP_USER, which APEX populates with the session’s user identifier. You can also call the APEX utility function v('APP_USER') in PL/SQL, or use the Oracle context function SYS_CONTEXT('USERENV','SESSION_USER') for the database schema user.
Example Methods
-
Substitution String in PL/SQL
BEGIN
  INSERT INTO audit_log (user_name, action_date)
  VALUES (:APP_USER, SYSDATE);
END;
-
APEX Utility Function
DECLARE
  l_user VARCHAR2(4000);
BEGIN
  l_user := v('APP_USER');
  -- use l_user as needed
END;
-
Oracle Context Function
DECLARE
  l_user VARCHAR2(30);
BEGIN
  l_user := SYS_CONTEXT('USERENV','SESSION_USER');
  -- returns the database schema user
END;
Using in Default Value Computations
-
In Page Designer, for a page item’s Default Value, choose PL/SQL Expression and enter:
v('APP_USER')or
SYS_CONTEXT('USERENV','SESSION_USER')
Using in Validations or Processes
-
Create a Validation of type PL/SQL Function Returning Boolean:
RETURN v('APP_USER') = 'ADMIN'; -
In a Process, reference
:APP_USERdirectly to record who performed an action.
By using these built‑in functions or substitution strings, you ensure that your application consistently and securely identifies the current user within any PL/SQL logic. This enables auditing, personalization, and fine‑grained security controls throughout your Oracle APEX application.
Example
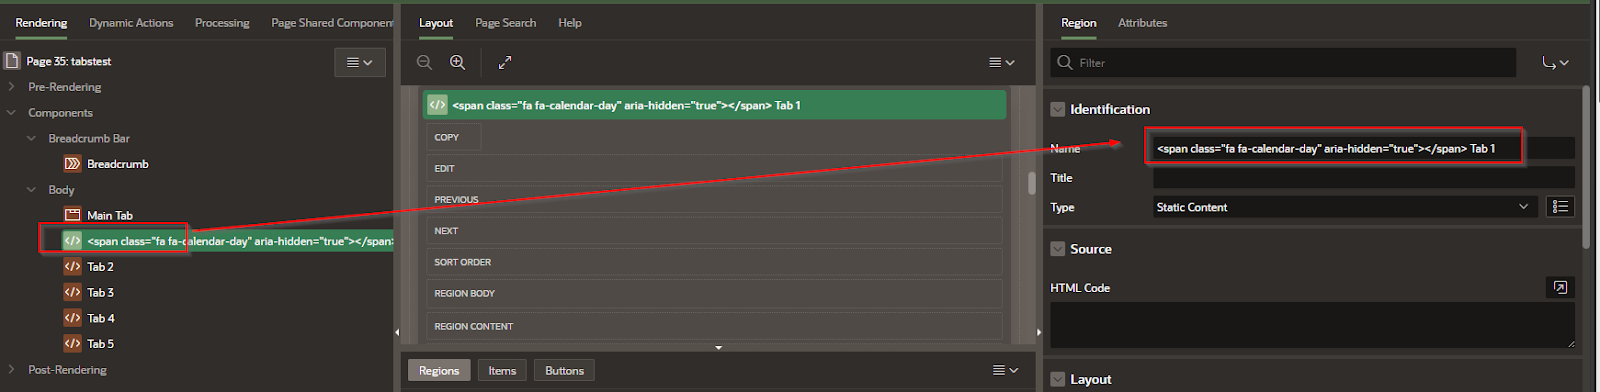
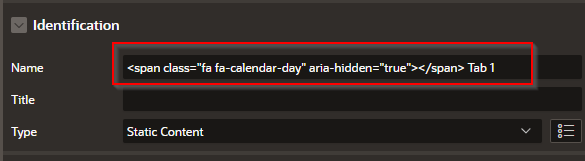
How do I Get the User name Using PL/sql Expression
Getting the User Name Using PL/SQL Expression in Oracle APEX
Retrieving the currently logged-in username in Oracle APEX is essential for tracking user actions, personalizing content, and managing security. This tutorial explains how to obtain the username using PL/SQL expressions within different APEX components.
Using the APP_USER Variable
Oracle APEX automatically provides the APP_USER variable, which holds the username of the currently logged-in user. This variable can be used in different places, such as SQL queries, PL/SQL processes, and page items.
Method 1: Using PL/SQL Expression in a Page Item
Open Page Designer in your APEX application.
Create a new page item (e.g., P1_USERNAME) of type Display Only.
Set the Value Type to PL/SQL Expression.
In the PL/SQL Expression field, enter:
:APP_USER
Save and run the page. The page item will now display the logged-in username.
Method 2: Using APP_USER in a SQL Query
You can use APP_USER in SQL queries to filter data based on the logged-in user.
Example: Retrieve employee details for the logged-in user
SELECT employee_id, name, department
FROM employees
WHERE username = :APP_USER;
This ensures that each user sees only their own records.
Method 3: Using APP_USER in PL/SQL Process
You can use APP_USER within a PL/SQL Process to store the username in a table or log user activity.
Example: Inserting the logged-in user's activity
INSERT INTO user_logs (username, login_time, action)
VALUES (:APP_USER, SYSDATE, 'Page Accessed');
This records every instance when a user accesses a page.
Method 4: Using APP_USER in a PL/SQL Function Returning a Value
If you need to use APP_USER in a function for validation or business logic, you can define a PL/SQL function as follows:
FUNCTION get_current_user RETURN VARCHAR2 IS
BEGIN
RETURN :APP_USER;
END get_current_user;
This function can be used in different PL/SQL components in your application.
Method 5: Displaying the Username in a Header or Footer
Go to Shared Components > User Interface > Breadcrumbs, Headers, or Footers.
Add the following PL/SQL block in the appropriate section:
Welcome, <b> &APP_USER. </b>
This dynamically displays the username in the header.
Best Practices
Use APP_USER for user-specific filtering and logging.
Store APP_USER in a table if you need a historical log of user activities.
Always validate user permissions before displaying data based on APP_USER.
Use APP_USER in combination with authorization schemes for secure access control.
The APP_USER variable in Oracle APEX makes it easy to retrieve the logged-in username using PL/SQL expressions. Whether you are storing user activity, filtering reports, or personalizing content, APP_USER ensures that your application dynamically adapts to each user's session.
EXAMPLE:
The key here is to use the PL/SQL EXPRESSION: apex_custom_auth.get_username
In this example we will save the value into a text box and call the expression at the time that the page loads.
Step 1 – Add a field to the page

Step 2- Add a dynamic action

In this case, in the Event> Page Load.
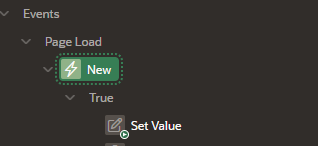
Set the Action: Set Value

Set Settings > Settings: PL/SQL Expression
Set Settings > PL/SQL Expression: apex_custom_auth.get_username
Set Settings > Items To Submit: P31_NEW (the name of your field)
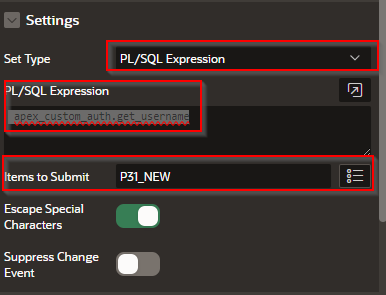
Set Affected Elements > Selection Type: Item(s)
Set Affected Elements > P31_NEW (Name of your Text Field)

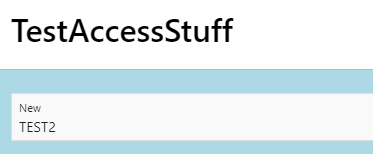
Here is the result. The name of the user (In this case Test2) is displayed in the box
By leveraging PL/SQL expressions to fetch the current username, you can implement robust auditing, display personalized greetings, or enforce row‑level security within your APEX applications. Whether you choose the APEX substitution string or the Oracle context function, integrating the user name into your PL/SQL logic enhances both the functionality and the security of your application.