Introduction
In Oracle APEX, dynamic and responsive user interfaces significantly enhance the usability of your applications. One of the key features available to developers is the ability to hide or display fields based on specific conditions. This can be controlled using a function—whether it's PL/SQL, JavaScript, or a built-in condition expression. By selectively showing or hiding form items, regions, or buttons, developers can streamline the user experience and prevent users from interacting with unnecessary or irrelevant fields.
In Oracle APEX, you can control the visibility of fields dynamically using functions, conditions, or client-side logic. This is especially useful when you want to show or hide form items based on the values of other items, user roles, or application state. You can accomplish this using Dynamic Actions, PL/SQL Conditions, or Server-Side Conditions. Below is a detailed explanation of each method using Arial font, 14px, plain text style, and no hard lines.
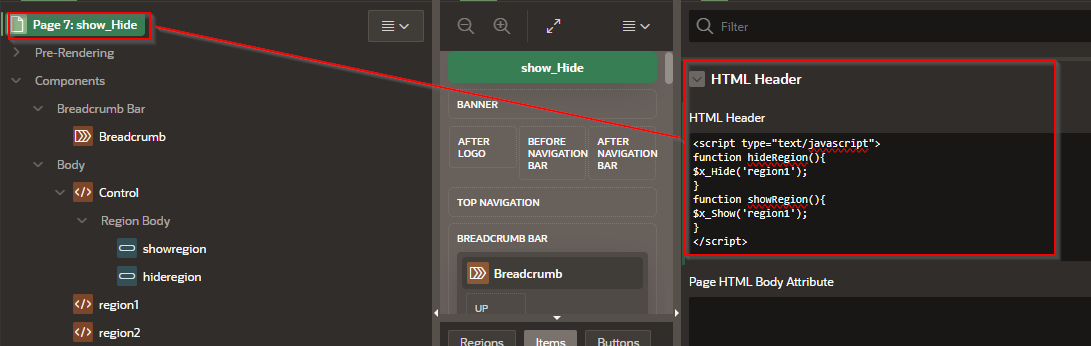
Using a JavaScript Function with Dynamic Actions
-
Open your page in Page Designer.
-
Select the item you want to evaluate (e.g., P1_STATUS).
-
On the left panel, click Dynamic Actions under the item or region.
-
Click Create Dynamic Action.
-
Set Name: Hide/Show Fields Based on Status.
-
Set Event: Change.
-
Set Selection Type: Item(s).
-
Set Item(s): P1_STATUS.
-
Click True Action > Set Action to Execute JavaScript Code.
-
Add code like this:
if ($v('P1_STATUS') === 'ACTIVE') {
    $x_Show('P1_DETAILS');
} else {
    $x_Hide('P1_DETAILS');
}
-
Under Affected Elements, set Selection Type to Item(s) and enter the field to hide/show (e.g., P1_DETAILS).
This will automatically show or hide the P1_DETAILS field when the value of P1_STATUS changes.
Using PL/SQL Function in Server-Side Condition
-
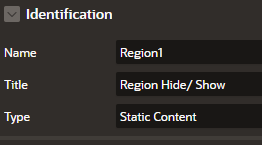
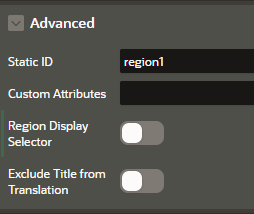
Select the item or region you want to control visibility for (e.g., P1_DETAILS).
-
Go to the Server-Side Condition section.
-
Set Type to PL/SQL Function Returning Boolean.
-
Enter PL/SQL like:
RETURN :P1_STATUS = 'ACTIVE';
This condition means that the field or region will only display when P1_STATUS is ACTIVE.
Using a Page Item Value Condition
-
Select the target field or region (e.g., P1_DETAILS).
-
Under Condition, choose Item = Value.
-
Select Item: P1_STATUS.
-
Value: ACTIVE.
When the page loads, the item will be visible only if the condition is true.
Tips
-
Use
$x_Showand$x_HideJavaScript functions for client-side item visibility. -
Use
apex.item().show()andapex.item().hide()for newer APEX versions as a best practice. -
Always test in both desktop and mobile views for responsive behavior.
By using these techniques, you can build highly interactive and context-sensitive pages in Oracle APEX that guide the user through the interface by displaying only relevant fields based on their input or session state.
Example
Hiding and displaying fields dynamically in APEX is useful for improving user experience by showing only relevant fields based on user actions or system conditions. This can be achieved using JavaScript functions, PL/SQL, or Dynamic Actions.
Method 1: Using a JavaScript Function (Client-Side Approach)
This approach allows you to control visibility instantly without requiring a page refresh.
Steps to Implement JavaScript for Hiding/Showing Fields
Create a JavaScript Function
Go to Page Attributes > Execute when Page Loads
Add the following JavaScript function
function toggleField(fieldName, show) {
var field = $('#' + fieldName);
if (show) {
field.show();
} else {
field.hide();
}
}
Call the Function When the Page Loads
toggleField('P1_FIELD_NAME', false); // Hides the field initially
Use a Dynamic Action to Call the Function
Event: Change
Selection Type: Item(s)
Item: P1_CONTROL_FIELD
Action: Execute JavaScript Code
Code:
if ($v('P1_CONTROL_FIELD') === 'Show') {
toggleField('P1_FIELD_NAME', true);
} else {
toggleField('P1_FIELD_NAME', false);
}
Method 2: Using PL/SQL to Control Visibility on Page Load
If the visibility is based on data conditions, use PL/SQL.
Steps to Hide/Show Fields Using PL/SQL
Create a Hidden Page Item
Example: P1_FIELD_VISIBILITY
Set the Value Using a PL/SQL Computation
CASE
WHEN :APP_USER = 'ADMIN' THEN 'SHOW'
ELSE 'HIDE'
END;
Use a Dynamic Action to Hide/Show the Field
True Action: Show P1_FIELD_NAME when P1_FIELD_VISIBILITY = SHOW
False Action: Hide P1_FIELD_NAME when P1_FIELD_VISIBILITY = HIDE
Method 3: Using a Dynamic Action (No JavaScript or PL/SQL Needed)
Create a Dynamic Action
Event: Change
Item: P1_CONTROL_FIELD
Add a True Action
Action: Show
Item: P1_FIELD_NAME
Condition: Item = Value
Value: Show
Add a False Action
Action: Hide
Item: P1_FIELD_NAME
Condition: Item != Value
Best Practices
Use JavaScript for real-time UI updates.
Use Dynamic Actions for no-code solutions.
Use PL/SQL if visibility depends on data conditions from the database.
Hiding and displaying fields in Oracle APEX can be done efficiently using JavaScript functions, Dynamic Actions, or PL/SQL computations, depending on the complexity of the requirement.
EXAMPLE:
This is an example of how to use a function for displaying and hiding items of a page.
The function
The following function returns a number (the count) that represents if the user is in a table with a match of the OKTA id and the Location id.
create or replace function IS_NAME_IN_ROLE_AND_LOCATION (OKTA1 NUMBER, LOC NUMBER)
return NUMBER
as
returnedCount NUMBER;
BEGIN
SELECT COUNT(*) INTO returnedCount
FROM
LOCATIONS
JOIN WKSP_XXDIIPAULTEST.SITE_MANAGEMENT_ROLES_TO_LOCATIONS
ON WKSP_XXDIIPAULTEST.SITE_MANAGEMENT_ROLES_TO_LOCATIONS.LOCATION = LOCATIONS.LOCATION_IDENTIFIER
JOIN WKSP_XXDIIPAULTEST.OKTA
ON WKSP_XXDIIPAULTEST.OKTA.ID = WKSP_XXDIIPAULTEST.SITE_MANAGEMENT_ROLES_TO_LOCATIONS.OKTA
where LOCATION_IDENTIFIER = LOC AND OKTA.ID = OKTA1 ;
RETURN returnedCount;
END;
/
Setting up the page
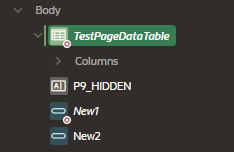
We are going to set up various elements in the page.
A database table that displays some data.
Name: TestPageDataTable
A textbox that will be used to save the value from the function and will be used for referencing the showing/hiding of elements.
Name: P9_HIDDEN
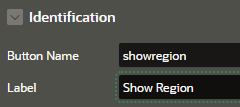
Two button that will be used for displaying how items can be shown or hidden.
Name: Button New1
Name: Button New2
Displaying data in the table
This is just a simple query used to display data on the table.
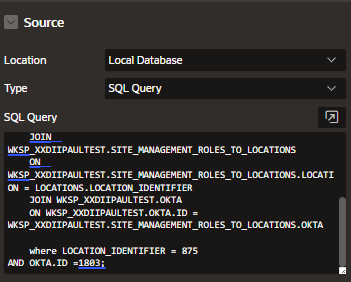
SELECT
LOCATION_IDENTIFIER,
LOCATION_NAME,
LOCATION_CODE,
OKTA,
OKTA.ID,
OKTA.DISPLAY_NAME
FROM
LOCATIONS
JOIN WKSP_XXDIIPAULTEST.SITE_MANAGEMENT_ROLES_TO_LOCATIONS
ON WKSP_XXDIIPAULTEST.SITE_MANAGEMENT_ROLES_TO_LOCATIONS.LOCATION = LOCATIONS.LOCATION_IDENTIFIER
JOIN WKSP_XXDIIPAULTEST.OKTA
ON WKSP_XXDIIPAULTEST.OKTA.ID = WKSP_XXDIIPAULTEST.SITE_MANAGEMENT_ROLES_TO_LOCATIONS.OKTA
where LOCATION_IDENTIFIER = 875
AND OKTA.ID =1803;
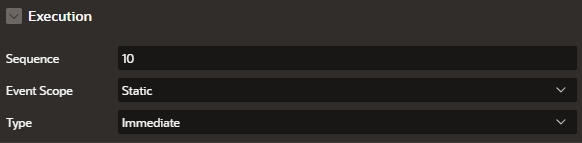
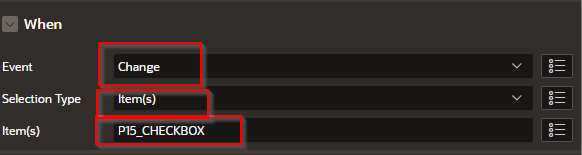
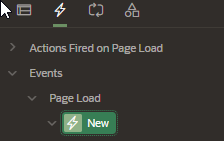
Page ONLOAD Event
Here we are going to create an event that will run when the paged is initially loaded and will do two things
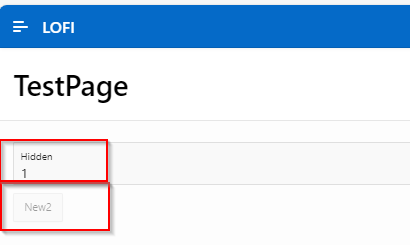
Set a value in the P9_HIDDEN textbox.
Disable the New2 button.
Add the On Load event
Next, add two actions to a “TRUE” action
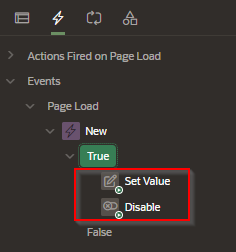
Set the P9_HIDDEN textbox to save the value from the function.
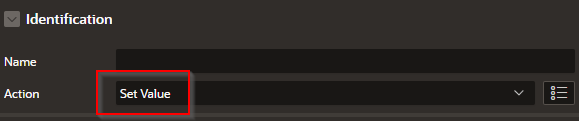
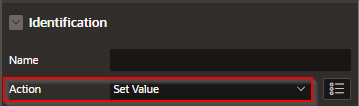
Calling the Function from within APEX
The function can be called using the following steps

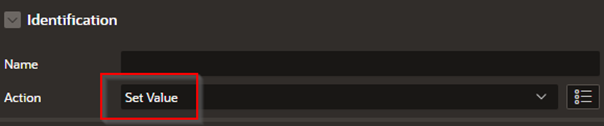
In the Identification area set the “Action” to “Set Value”.
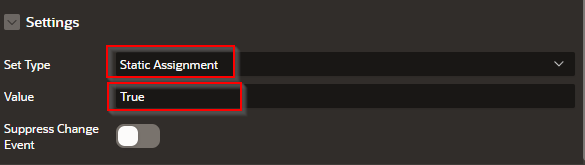
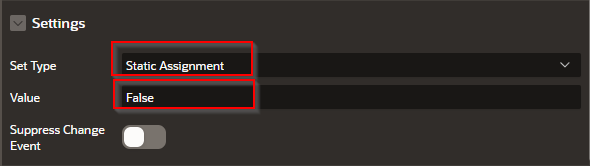
In the Settings area
Set Type to “PL/SQL Function Body”
In the PL/SQL Function Body place the following code:
DECLARE
L_RETURN_VALUE NUMBER;
L_OKTA1 NUMBER := 1803;
L_LOC NUMBER := 875;
BEGIN
L_RETURN_VALUE := WKSP_XXDIIPAULTEST.IS_NAME_IN_ROLE_AND_LOCATION(
OKTA1 => L_OKTA1,
LOC => L_LOC
);
RETURN L_RETURN_VALUE;
END;

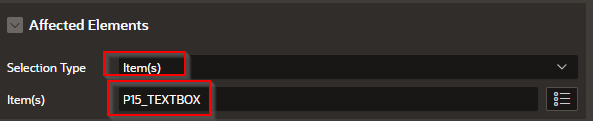
In the Affected Elements select the item/textbox that will hold the data from the function
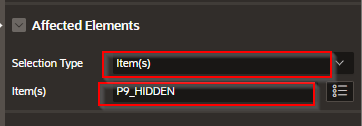
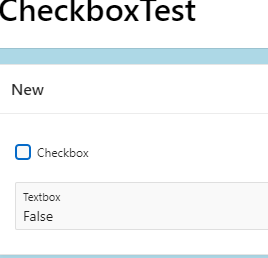
Compile and save and run. Notice that the Hidden” text box now displays the value from the function. Notice that the “New2” button is disabled.
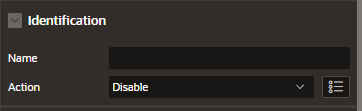
To disable the New2 button – Add a second action to the true event.
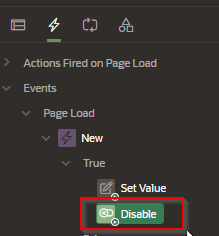
Set the “Identification” to “Disable
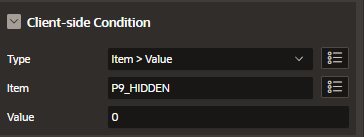
Set the Client-Side Condition This means that the button will be disabled anytime that P9_HIDDEN has a value greater than 0. In the case of our function, it always returns a value > 0. That makes the button always disabled.
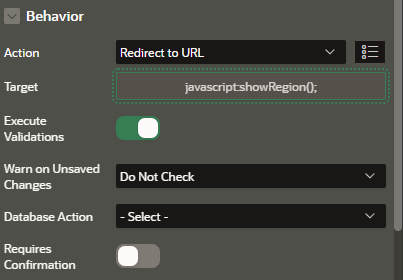
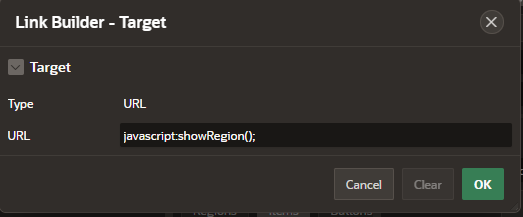
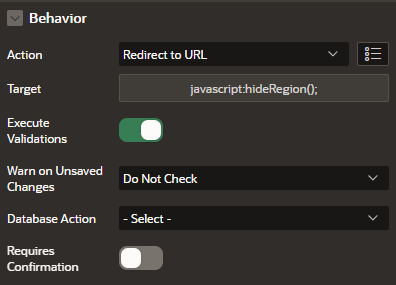
BONUS
You can also hide/display the item (button) by using the Server-side conditions
Will display when Item is not ZERO
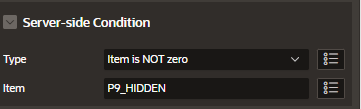
Displays the button because p9_HIDDEN has a value of 1
Conclusion
Controlling the visibility of form fields using a function in Oracle APEX is a powerful technique to create dynamic and user-friendly applications. Whether you're working with conditional PL/SQL logic or JavaScript functions triggered by Dynamic Actions, hiding and displaying fields based on user actions or application logic helps maintain a clean, focused interface. Mastering this technique not only improves usability but also ensures a more intuitive workflow for users across various pages and forms.