Search This Blog

Tuesday, June 24, 2025

How Do I Adjust the menu bar

Adjusting the Navigation Bar Menu in Oracle APEX

The Navigation Bar in Oracle APEX is managed through a List in Shared Components. You can reorder items, add dropdown menus, and organize navigation elements for a better user experience.


Moving a Navigation Bar Entry

If you want to reposition the "Menu" entry to appear before the user’s name, follow these steps:

  1. Open Your Application

    • Go to App Builder and select your application.

  2. Access Shared Components

    • Click Shared Components from the Application Home page.

  3. Locate the Navigation Bar List

    • Under Navigation and Lists, select Lists.

    • Open the Navigation Bar list for editing.

  4. Adjust the Sequence

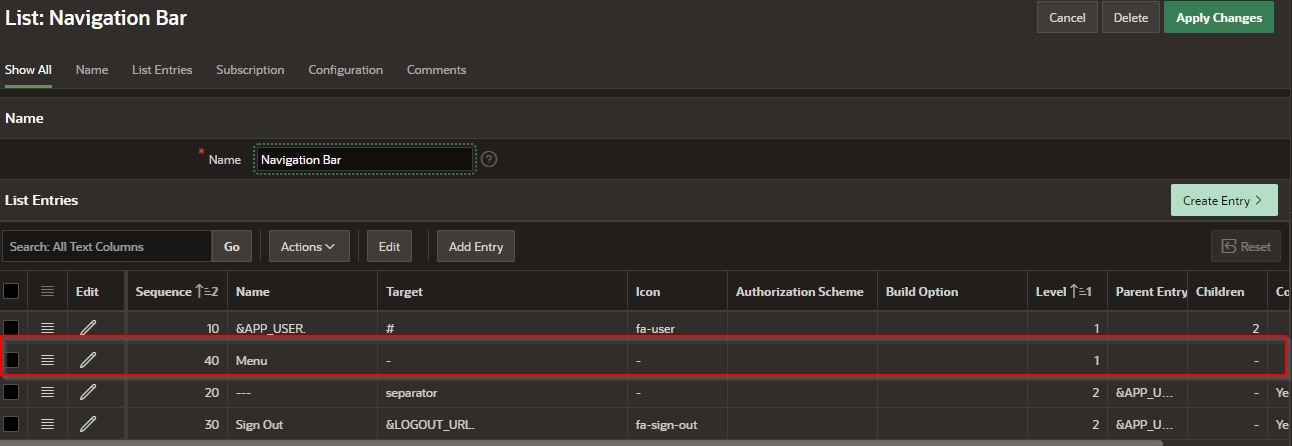
    • Find the "Menu" entry.

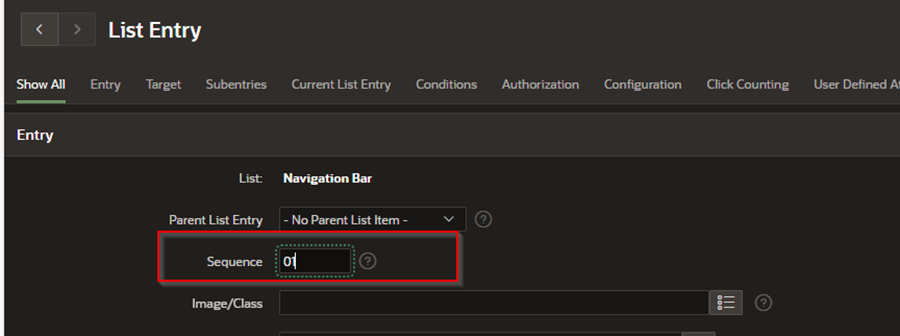
    • In the Entry Section, change the Sequence to 01 (or a lower number than other entries).

    • Click Apply Changes to save.

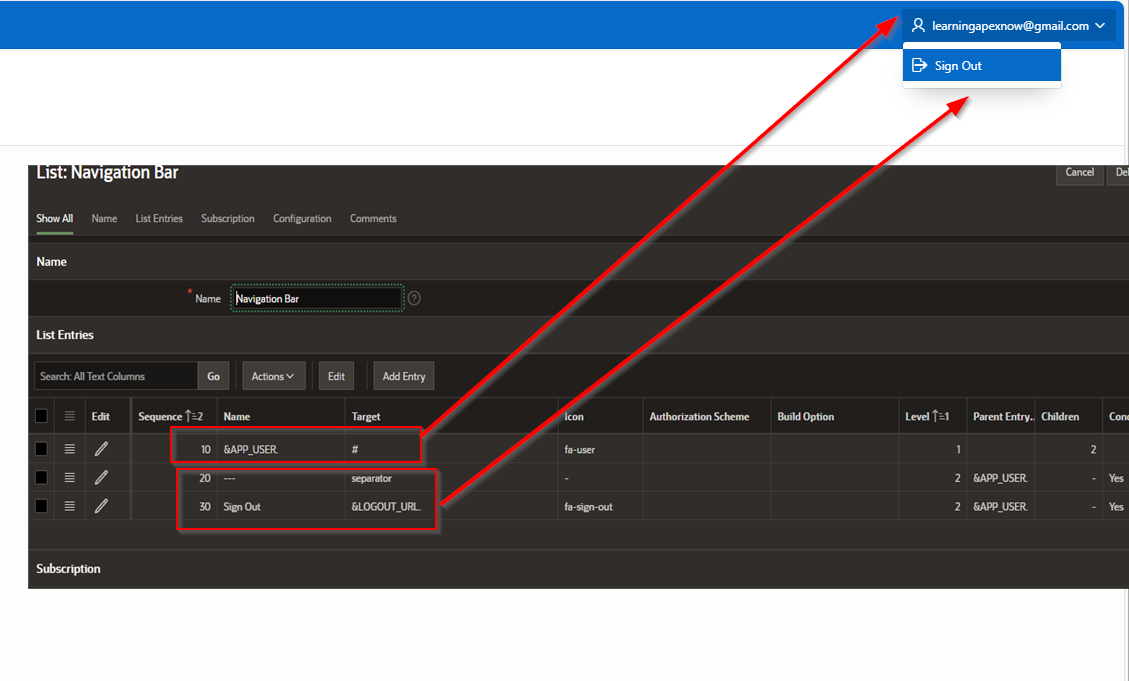
Result: The "Menu" entry will now appear to the left of the user's name.


Adding a Dropdown Menu to the Navigation Bar

To add pages under the "Menu" entry as a dropdown, follow these steps:

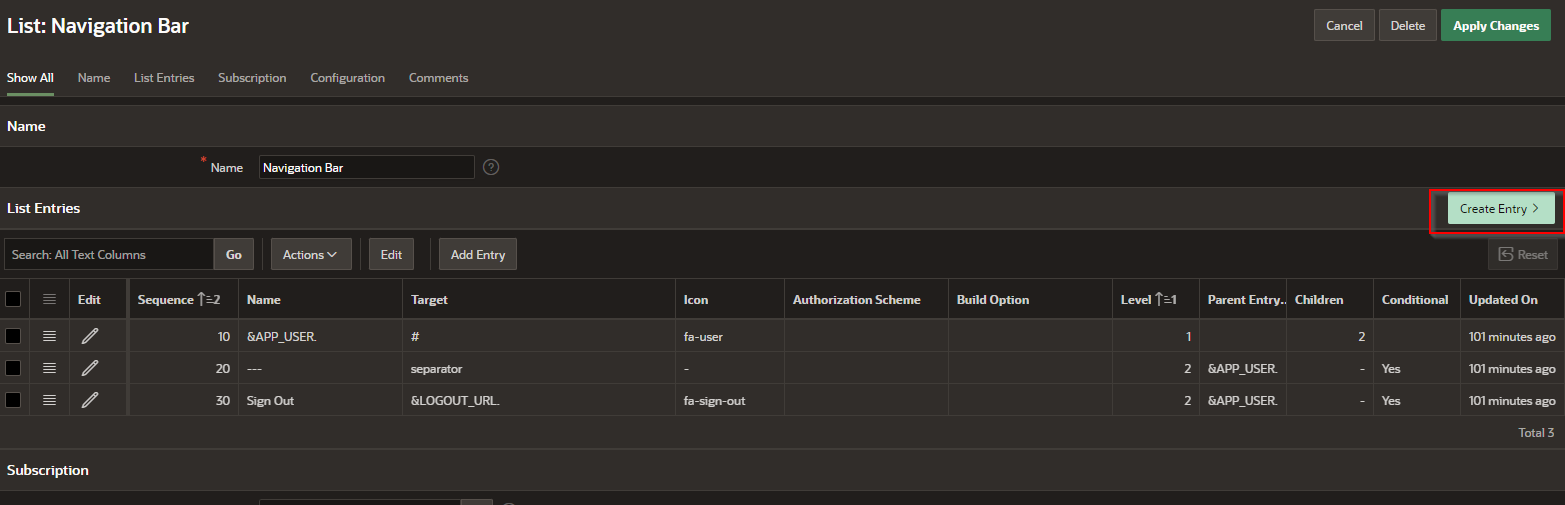
Step 1: Create Sub-Entries for the Menu

  1. In the Navigation Bar List, click Create List Entry.

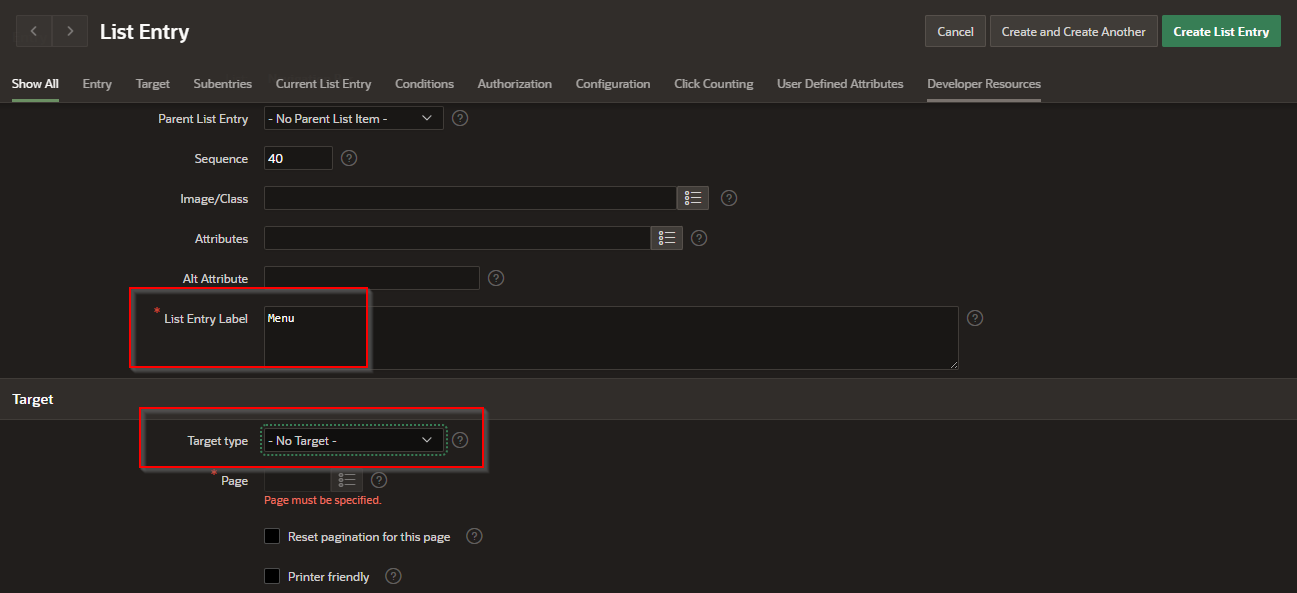
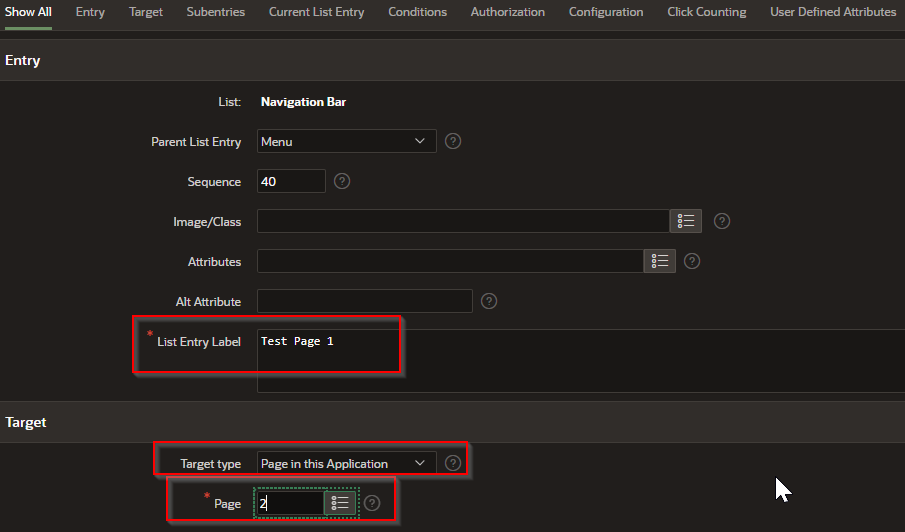
  2. Enter the following details for each page (Test Page 1, 2, 3):

    • Label: Enter the page name (e.g., Test Page 1).

    • Target: Set the link to the page (e.g., f?p=&APP_ID.:1:&SESSION. for Page 1).

    • Parent List Entry: Select Menu (this ensures the page appears as a dropdown under "Menu").

    • Sequence: Set a numerical order (e.g., 10, 20, 30 for the three pages).

  3. Click Create to save the entries.

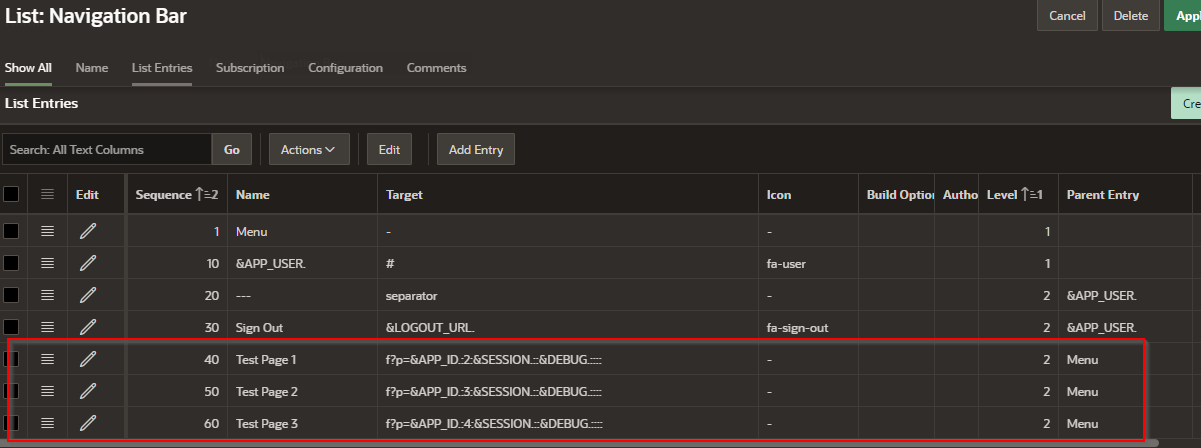
Step 2: Verify Dropdown Structure

  • In the List Editor, confirm that Test Pages 1, 2, and 3 appear indented under the "Menu" entry.

  • Run the application to test the dropdown behavior.

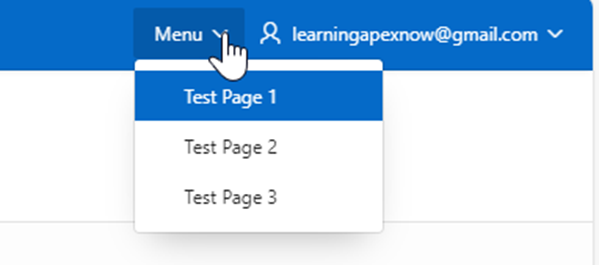
Result: Clicking "Menu" will now display a dropdown containing links to Test Page 1, Test Page 2, and Test Page 3.


Finalizing Changes

  • Reorder List Entries as needed for proper organization.

  • Apply Conditional Display Rules to restrict visibility for certain users.

  • Test the Navigation Bar across different devices for responsiveness.

By adjusting the Navigation Bar and creating dropdown menus, you can enhance user navigation and provide a more intuitive experience in your Oracle APEX application. 


EXAMPLE:

Lets move the “menu” entry from the far right to the left of the user’s name.

In the List entry > Entry section – change the Sequence to 01

A screenshot of a computer

AI-generated content may be incorrect.


The change moves the “Menu” to the left of the name

A blue menu box with white text

Description automatically generated

How do I add dropdown pages to the added “Menu” item in the navigation Bar?

Lets add pages to the “Menu’s navigation. We will do the following for three Test Pages (1,2,3).

A screenshot of a computer

Description automatically generated

Should look something like this

A screenshot of a computer

Description automatically generated


A screenshot of a computer menu

AI-generated content may be incorrect.


How Do I Add to the Navigation Bar

 Adding Items to the Navigation Bar in Oracle APEX

The Navigation Bar in Oracle APEX is controlled by a List found in Shared Components. You can add new entries to the Navigation Bar to include links to profile pages, logout functionality, help documentation, or any other relevant pages.


Step 1: Create a New List Entry

  1. Open Your Application

    • Go to App Builder and select your application.

  2. Access Shared Components

    • Click Shared Components on the Application Home page.

  3. Locate the Navigation Bar List

    • Under Navigation and Lists, select Lists.

    • Find the Navigation Bar list (usually named "Navigation Bar" or similar).

  4. Open the List Editor

    • Click the Navigation Bar list to edit its entries.


Step 2: Add a New Navigation Bar Entry

  1. Click Create List Entry.

  2. Enter List Entry Details:

    • Label – The text that will appear in the Navigation Bar (e.g., Profile, Logout, Help).

    • Target – Specify where the entry should link to: 

      • Profile Page: f?p=&APP_ID.:100:&SESSION. (Replace 100 with the actual page ID).

      • Logout: &LOGOUT_URL. (Logs out the user).

      • Help Page: https://yourdomain.com/help.

    • Icon – Assign an appropriate icon (e.g., fa-user, fa-sign-out-alt, fa-question-circle).

    • Condition – Set visibility conditions if needed (e.g., show only when the user is logged in).

  3. Click Create to save the new Navigation Bar entry.


Step 3: Review the Navigation Bar List

Once created, the new entry appears in the List Editor alongside existing items. You can:

  • Reorder items by dragging them into the preferred sequence.

  • Modify or Delete entries as needed.

  • Apply Conditional Display Rules to show or hide entries based on user roles or authentication status.


Finalizing Changes

  1. Save all modifications in the List Editor.

  2. Run your application to confirm that the new Navigation Bar entry appears as expected.

By following these steps, you can easily customize the Navigation Bar to improve user experience and navigation within your Oracle APEX application.


EXAMPLE:

  • Step 1 – Create a new Entry

A screenshot of a computer

Description automatically generated

  • Step 2- create the bar entry.

A screenshot of a computer

Description automatically generated

  • This is how it looks in the list.

A screenshot of a computer

Description automatically generated

  • The final result:

A blue background with white text

Description automatically generated


How Do I Change the Navigation Bar

Modifying the Navigation Bar in Oracle APEX

The Navigation Bar in Oracle APEX is a customizable area at the top of the page, typically used to display user information, links, and actions such as login/logout, profile settings, or help links. The Navigation Bar is controlled through a List in Shared Components, which can be modified to include custom links, icons, or dynamic content.


Understanding the Navigation Bar List

In the List Editor, the Navigation Bar contains entries such as:

  • "&APP_USER." – This is a substitution variable that displays the currently logged-in user's name.

  • "#" – A placeholder used when the list item does not contain a hyperlink (for example, for displaying static text like the username).


Steps to Modify the Navigation Bar

1. Locate the Navigation Bar List

To change the Navigation Bar contents, follow these steps:

  1. Open Your Application

    • In APEX, go to the App Builder and select your application.

  2. Navigate to Shared Components

    • Click on Shared Components from the Application Home page.

  3. Find the Lists Section

    • Under Navigation and Lists, click on Lists.

  4. Select the Navigation Bar List

    • Find the list used for the Navigation Bar (typically named Navigation Bar or something similar).

    • Click on it to open the List Editor.


2. Editing the Navigation Bar Items

Once inside the List Editor, you can modify existing entries or add new ones.

Modify Existing Items:

  • Click on an item (e.g., &APP_USER.) to edit it.

  • You can change: 

    • Label (Text displayed in the navigation bar).

    • Target (Specify a URL if it should link somewhere; use # if it's just a display item).

    • Icon (Add an icon using Font Awesome or APEX icon classes).

Example: Changing the Display of Logged-in User

Instead of just displaying &APP_USER., you can customize it to include additional details:

  • Example Label: Welcome, &APP_USER.!

  • Target: # (No link, just a static text).


3. Adding New Items to the Navigation Bar

To add new items such as Logout, Profile, or Help, follow these steps:

  1. In the List Editor, click "Create List Entry".

  2. Enter a Label (e.g., Profile, Logout, or Help).

  3. Specify a Target (Link): 

    • Profile Page: f?p=&APP_ID.:100:&SESSION. (Replace 100 with the Profile Page ID).

    • Logout: &LOGOUT_URL. (Automatically logs out the user).

    • Help: A URL to your application's help page, like https://yourdomain.com/help.

  4. Set an Icon: 

    • For a profile: fa-user

    • For logout: fa-sign-out-alt

    • For help: fa-question-circle


4. Reordering and Managing Visibility

  • Reorder List Items: Drag and drop items in the List Editor to change their order.

  • Conditionally Display Items: Use conditions to show or hide items based on: 

    • User role (APP_USER = 'ADMIN')

    • Authentication status (APP_USER IS NOT NULL for logged-in users).


5. Applying Changes to the Application

  1. Save the changes in the List Editor.

  2. Run the application to verify that the Navigation Bar reflects the updates.


The Navigation Bar in Oracle APEX is a powerful tool for displaying important user information and quick-access links. By modifying the associated List, you can customize its content, appearance, and behavior to match your application’s needs.


EXAMPLE:

If we start with a navigation bar like this:

This is what we find in the List Editor for the Navigation Bar. “&APP_USER.” Is used to the login name of the user. The “#” is used to signify that this is not a hyperlink entry. 

A screenshot of a computer

Description automatically generated


UI Defaults

 In Oracle APEX, User Interface (UI) Defaults are a set of metadata-driven, table- and column-scoped attributes that APEX consults when it g...